Create an (2-tier web application) OCI Compute Instance web server and use an OCI Oracle Managed Database as the main back-end
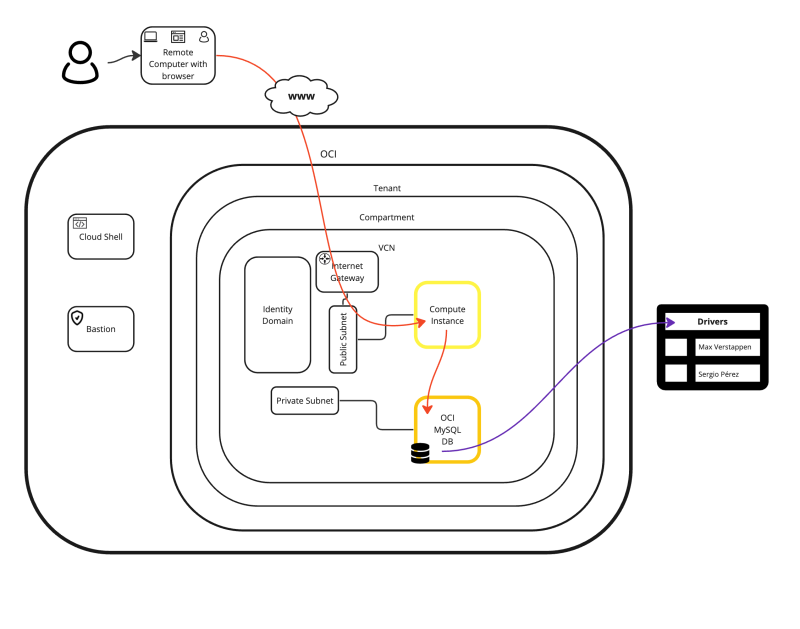
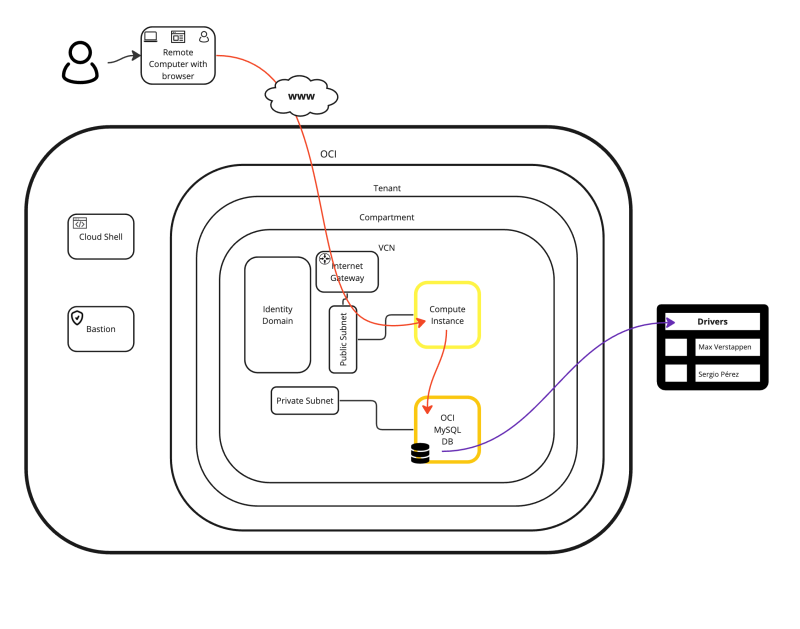
In this article, I will create a 2-tier application consisting of an OCI Compute Instance (webserver) and an OCI Database service (MySQL). I have created a sample website and a sample database and this website will retrieve the data from the OCI database/table.
💡 The PHP website/script with the MySQL data that I used for testing purposes in this article can be found on my Github page.
The Steps
- STEP 01: Create a new VCN
- STEP 02: Create a new Public Subnet and Private Subnet
- STEP 03: Create a new OCI Compute Instance
- STEP 04: Create a new OCI MySQL Database engine
- STEP 05: Create a new Database with sample data (1 table with 2 records)
- STEP 06: Install and Configure an NGINX webserver with PHP support
- STEP 07: Create a website that connects to the database and displays the records on a webpage
STEP 01» Create a new VCN
I already have a VCN in place but if you still need to create a new VCN, I have explained how to do this in this article.
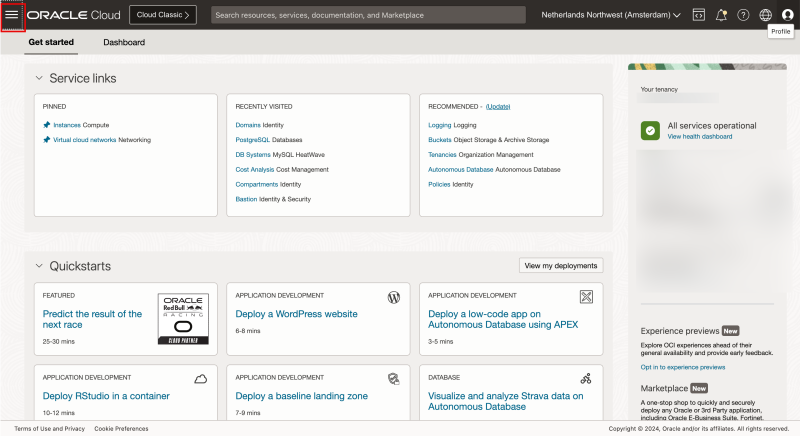
Click in the left upper corner of the hamburger menu.
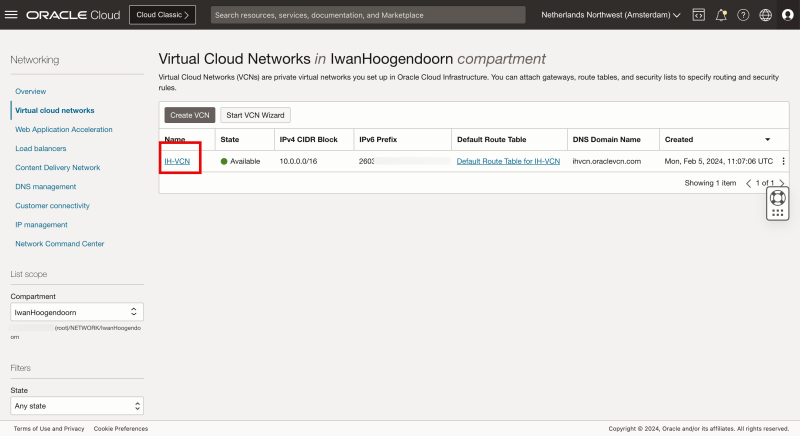
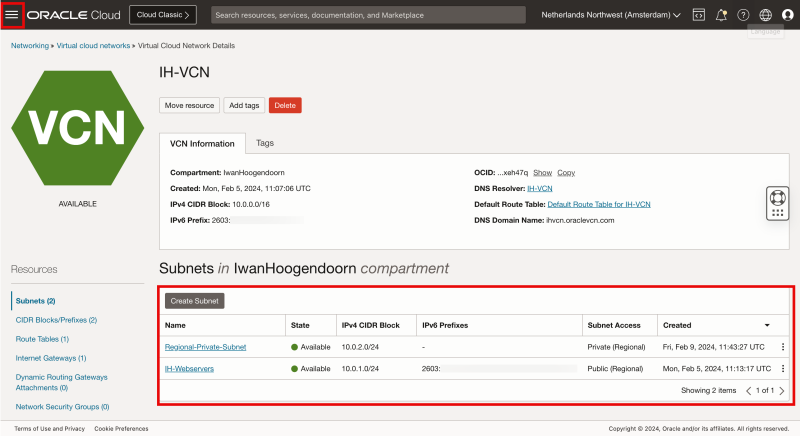
Select “Virtual Cloud Networking” to verify if the Virtual Cloud Network exists.
In my case, I have a VCN that I have created earlier.
STEP 02» Create a new Public Subnet and Private Subnet
I already have a Public and Private Subnet in place but if you still need to create new Subnets, I have explained how to do this in this article (Public Subnet) and this article (Private Subnet).
Inside my VCN I have a Public and Private Subnet available that I will be using.
I will connect my OCI Compute Instance to the Public Subnet and I will connect the OCI Database to the Private Subnet.
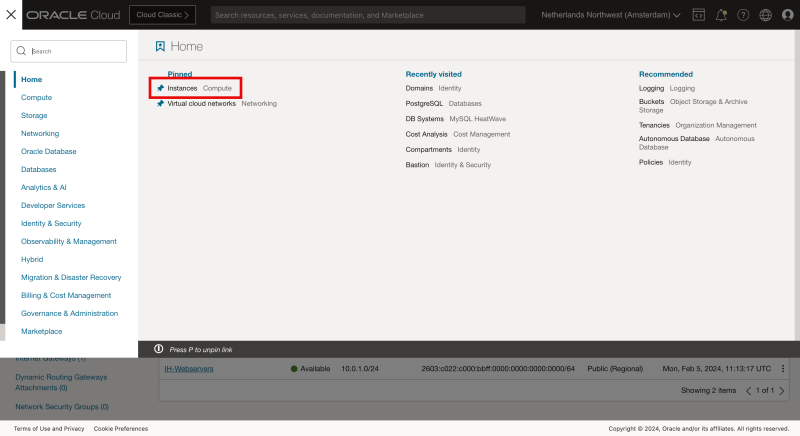
To review the available OCI Compute Instances click in the left upper corner on the hamburger menu.
STEP 03» Create a new OCI Compute Instance
I already have an OCI Compute Instance in place but if you still need to create a new OCI Compute Instance, I have explained how to do this in this article.
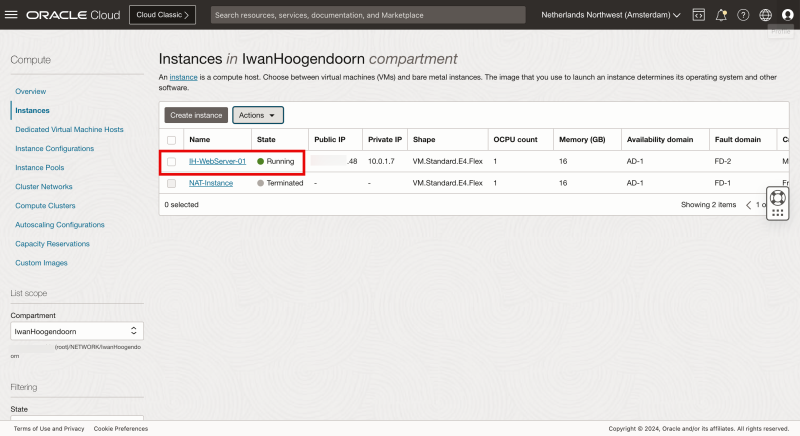
Click on “Instances” to review the OCI Compute Instances.
My Public facing Compute Instance is up and running.
STEP 04» Create a new OCI MySQL Database engine
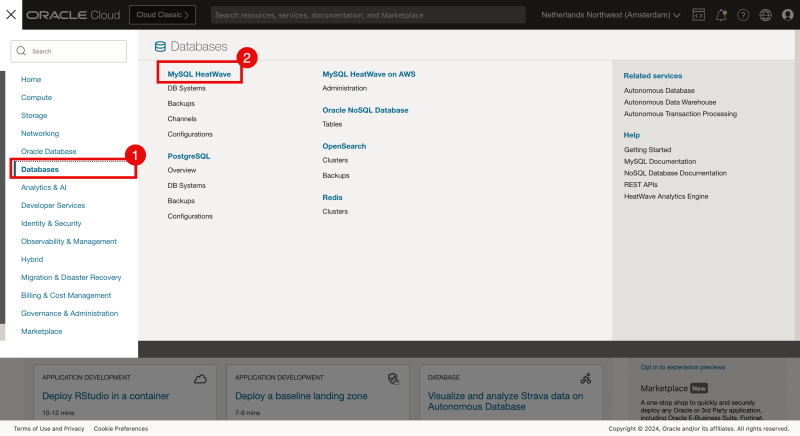
Click in the left upper corner of the hamburger menu.
- Click on “Databases”.
- Click on “MySQL HeatWave”.
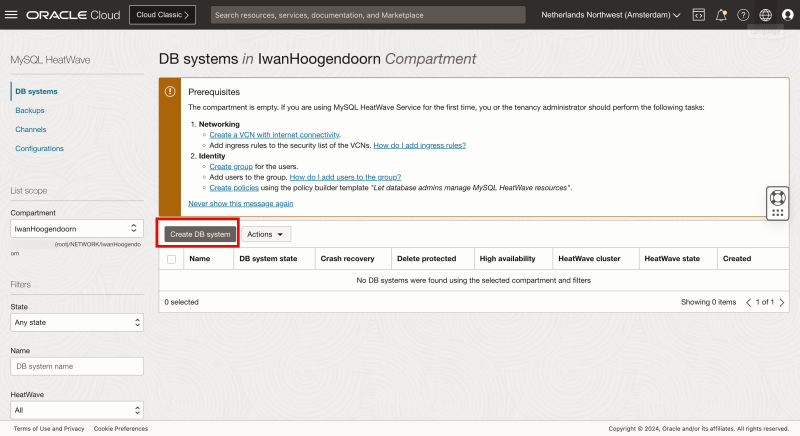
Click on “Create DB system”.
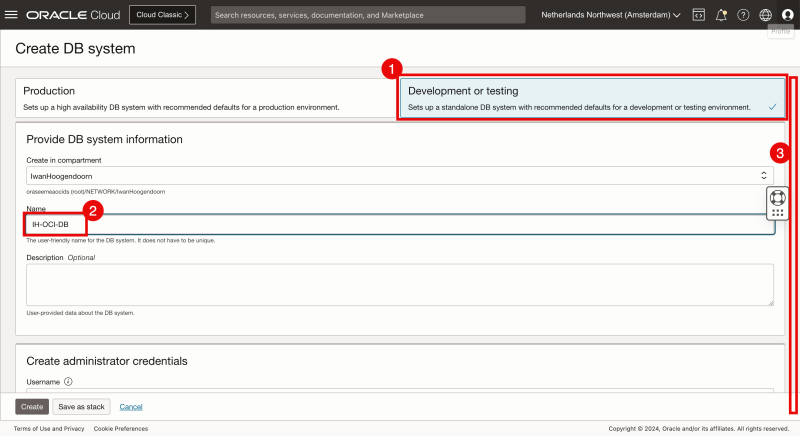
- Select “Development or Testing”.
- Specify a name.
- Scroll down.
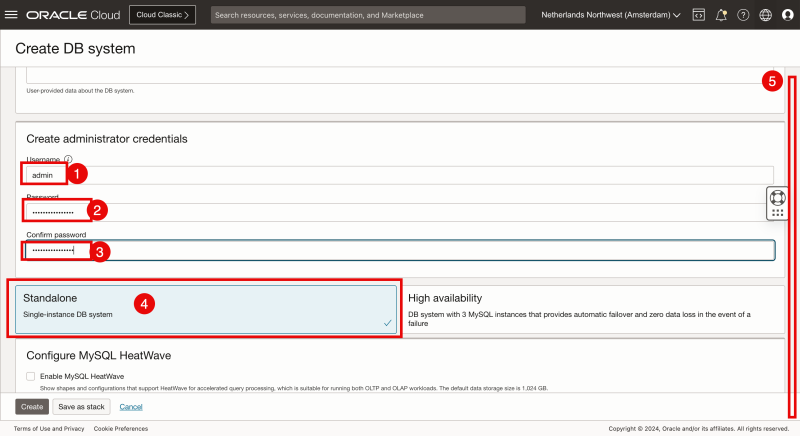
- Specify a (database) username.
- Specify a (database) password.
- Confirm the (database) password.
- Click on “Standalone”.
- Scroll down.
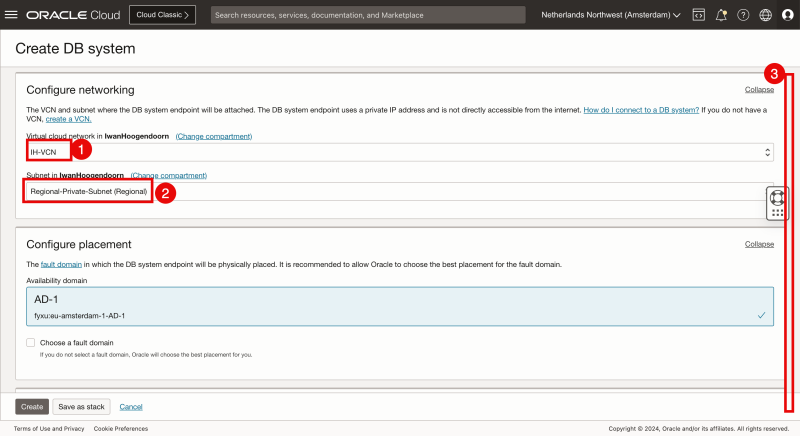
- Select the VCN the database needs to be in.
- Select the (Private) Subnet the database needs to connect to.
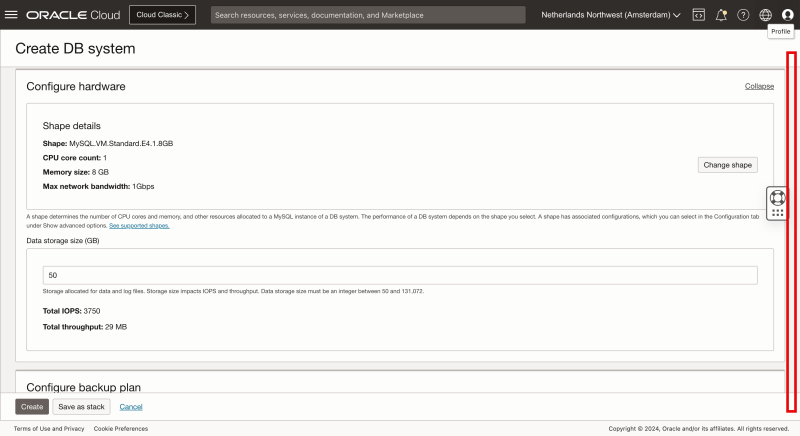
- Scroll down.
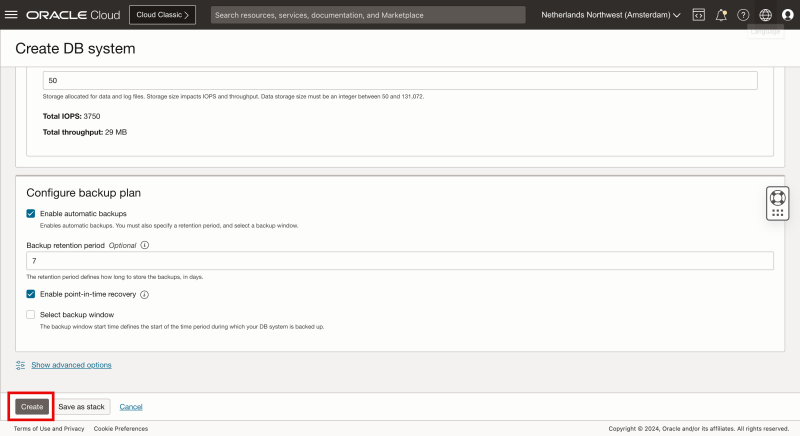
Scroll down.
Click on “Create” to create the database.
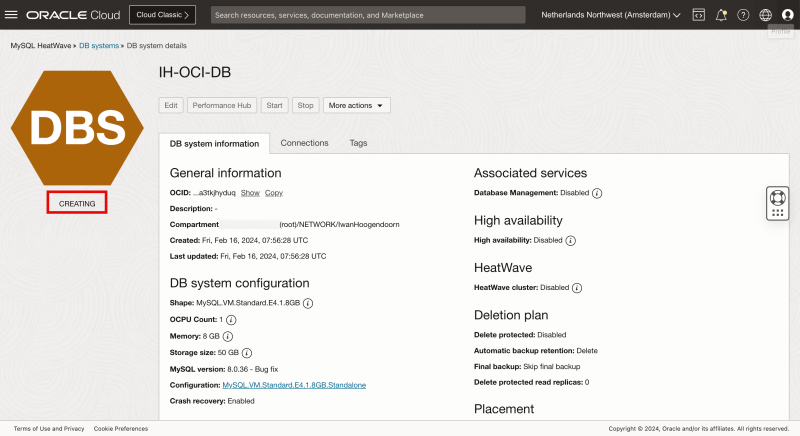
Review that the database status is “CREATING”.
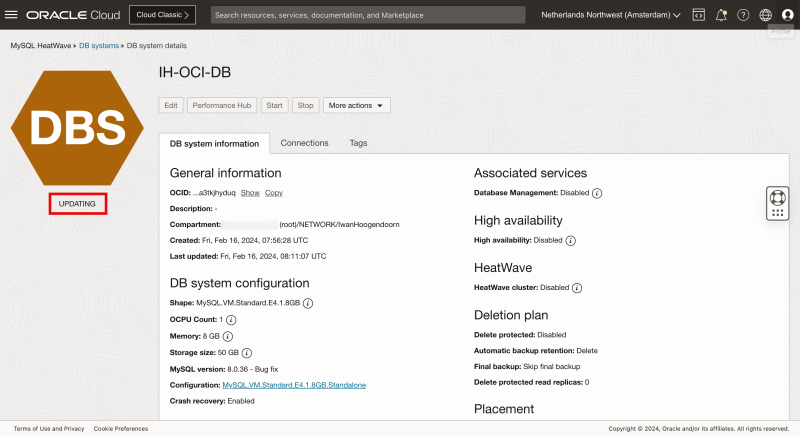
Review that the database status is “UPDATING”.
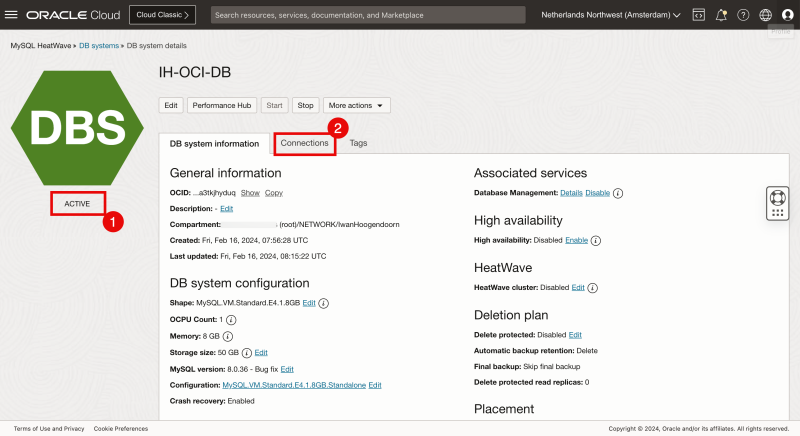
- Review that the database status is “ACTIVE”.
- Click on the “Connections” tab.
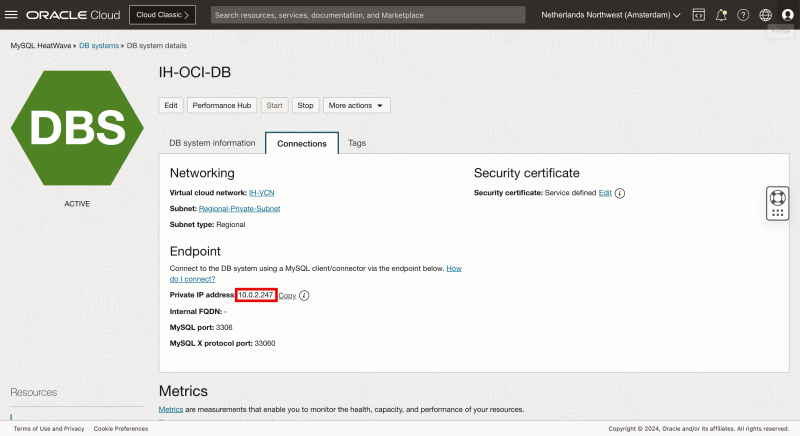
Review the Private IP address (10.0.2.247) that needs to be used later to configure and access the MySQL database.
STEP 05» Create a new Database with sample data 1 table with 2 records
To access and configure the OCI MySQL Database I need to install MySQL Shell.
This is done with the following command:
[opc@ih-webserver-01 ~]$ sudo yum install mysql-shell
After installing MySQL Shell I tried to access the OCI MySQL Database with this command:
[opc@ih-webserver-01 ~]$ mysqlsh admin@10.0.2.247
Please provide the password for 'admin@10.0.2.247': ****************

MySQL Shell 8.0.35

Copyright (c) 2016, 2023, Oracle and/or its affiliates.
Oracle is a registered trademark of Oracle Corporation and/or its affiliates.
Other names may be trademarks of their respective owners.

Type '\help' or '\?' for help; '\quit' to exit.
Creating a session to 'admin@10.0.2.247'
MySQL Error 2003 (HY000): Can't connect to MySQL server on '10.0.2.247:3306' (110)
[opc@ih-webserver-01 ~]$
I can not connect to the OCI MySQL Database and the reason for this is that I have not allowed the database ports on the default Security List.
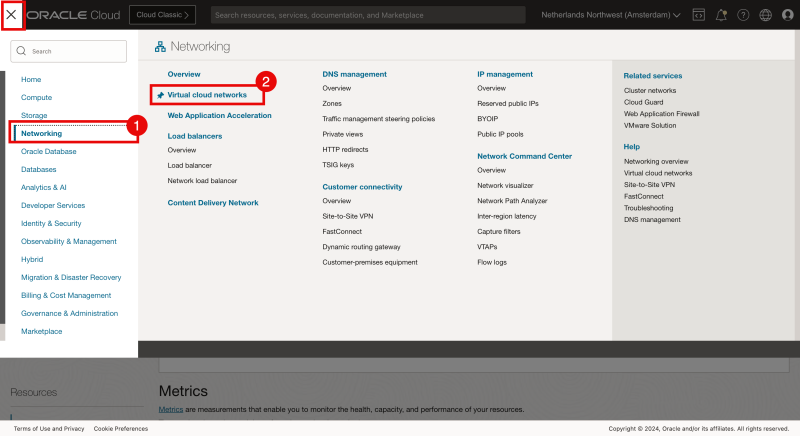
Click on the hamburger menu in the OCI Console.
- Click on “Networking”
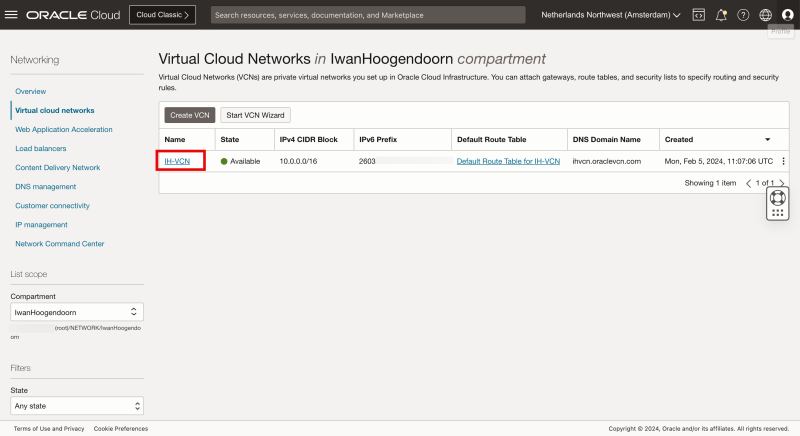
- Click on “Virtual cloud networks”.
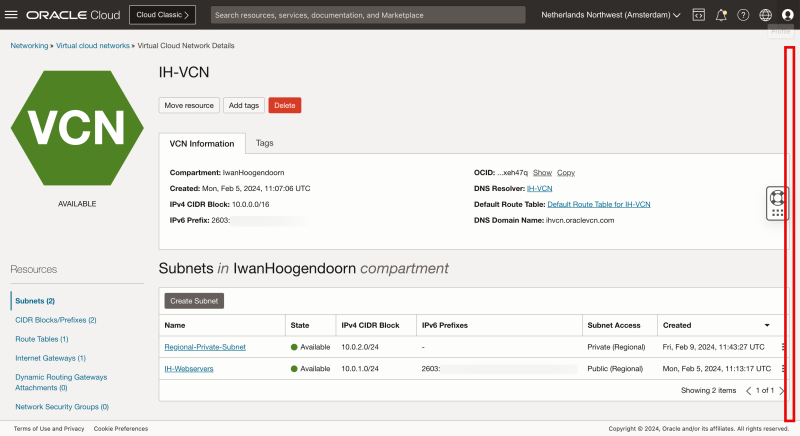
Click on the VCN.
Scroll down.
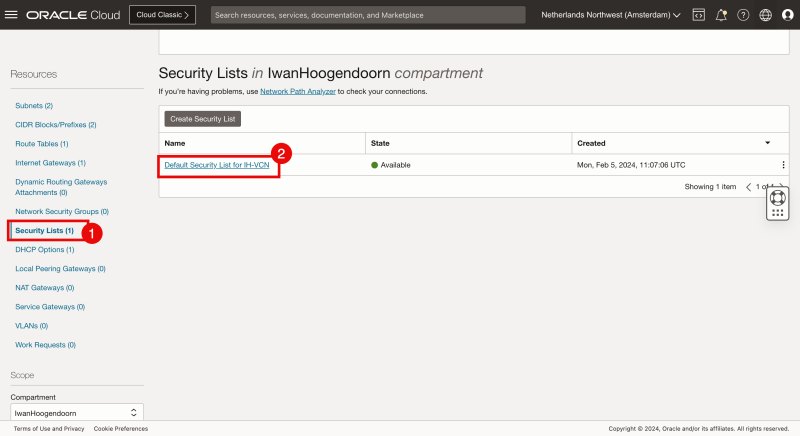
Click on “Security Lists”.
Click on the default security list.
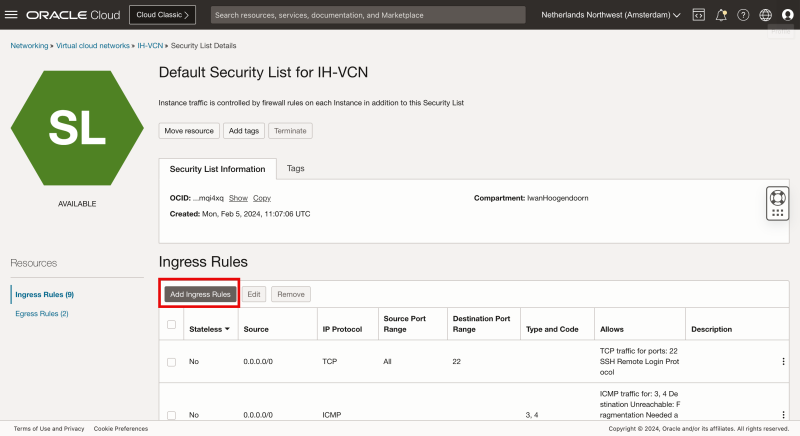
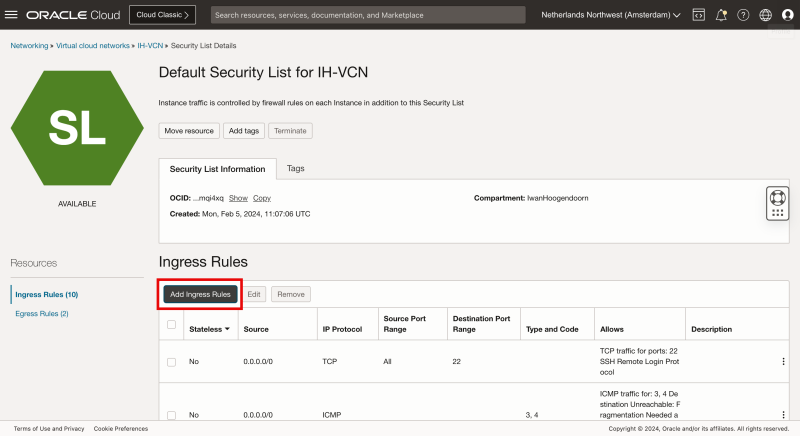
Click on “Add Ingress Rule”.
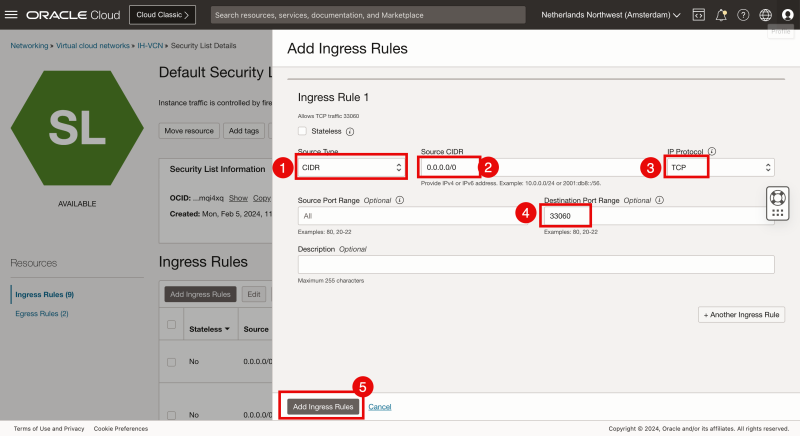
- Select “CIDR” as the Source Type.
- To allow traffic coming from all sources specify 0.0.0.0/0 for the Source CIDR.
- Select “TCP” for the IP Protocol.
- Specify the destination port to be “33060”.
- Click on “Add Ingress Rules”.
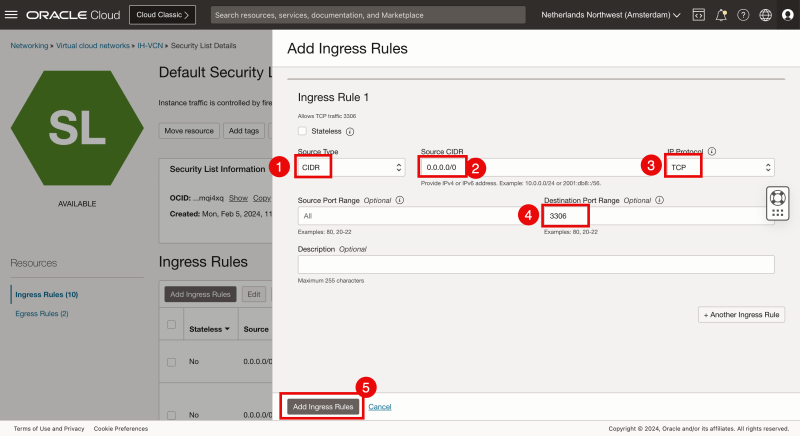
Click on “Add Ingress Rule” again.
- Select “CIDR” as the Source Type.
- To allow traffic coming from all sources specify 0.0.0.0/0 for the Source CIDR.
- Select “TCP” for the IP Protocol.
- Specify the destination port to be “3306”.
- Click on “Add Ingress Rules”.
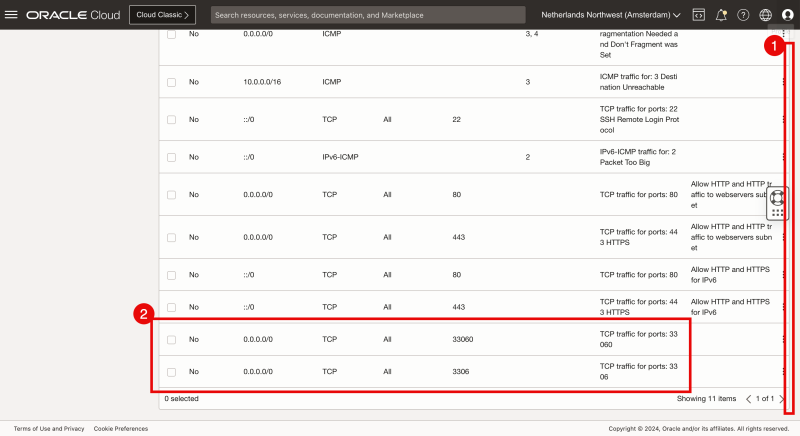
- Scroll down.
- Review if the rules for TCP ports 33060 and 3306 are configured.
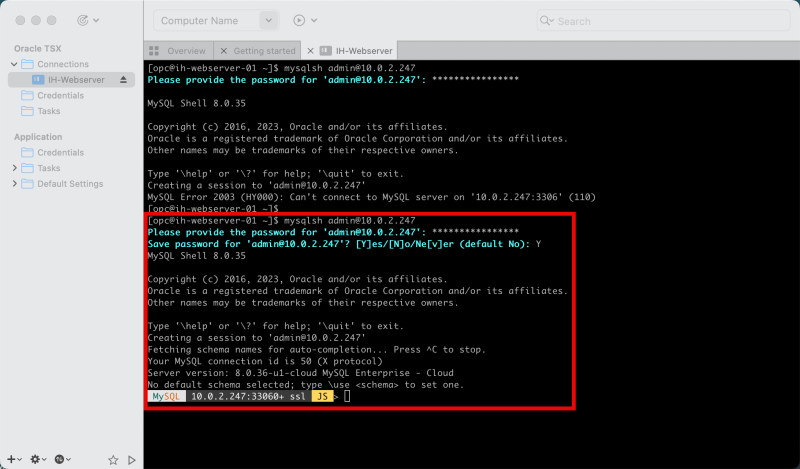
After the Ingress Rules are added to the Default Security List I am now able to access the OCI Database using the MySQL Shell with this command:
[opc@ih-webserver-01 ~]$ mysqlsh admin@10.0.2.247
Please provide the password for 'admin@10.0.2.247': ****************
Save password for 'admin@10.0.2.247'? [Y]es/[N]o/Ne[v]er (default No): Y
MySQL Shell 8.0.35

Copyright (c) 2016, 2023, Oracle and/or its affiliates.
Oracle is a registered trademark of Oracle Corporation and/or its affiliates.
Other names may be trademarks of their respective owners.

Type '\help' or '\?' for help; '\quit' to exit.
Creating a session to 'admin@10.0.2.247'
Fetching schema names for auto-completion... Press ^C to stop.
Your MySQL connection id is 50 (X protocol)
Server version: 8.0.36-u1-cloud MySQL Enterprise - Cloud
No default schema selected; type \use <schema> to set one.
 MySQL  10.0.2.247:33060+ ssl  JS >
I am now able to access the OCI Database successfully.
After accessing the OCI Database with MySQL Shell the following command will make my life a bit easier in the future by enabling autosave, command history, and the mode.
MySQL  10.0.2.247:33060+ ssl  JS > shell.options.setPersist('history.autoSave', 1)
MySQL  10.0.2.247:33060+ ssl  JS > shell.options.setPersist('history.maxSize', 5000)
MySQL  10.0.2.247:33060+ ssl  JS > shell.options.setPersist('defaultMode', 'sql')
To display all the existing databases use the following command:
MySQL  10.0.2.247:33060+ ssl  SQL > SHOW DATABASES;
+--------------------+
To create a new database use the following command:
MySQL  10.0.2.247:33060+ ssl  SQL > CREATE DATABASE F1;
Query OK, 1 row affected (0.0066 sec)
To verify if the database has been created use the following command:
MySQL  10.0.2.247:33060+ ssl  SQL > SHOW DATABASES;
+--------------------+
To use the new database (to create tables and records) use the following command:
MySQL  10.0.2.247:33060+ ssl  SQL > USE F1
Default schema set to `F1`.
Fetching global names, object names from `F1` for auto-completion... Press ^C to stop.
 MySQL  10.0.2.247:33060+ ssl  F1  SQL >
To display all the existing tables in the database use the following command:
MySQL  10.0.2.247:33060+ ssl  F1  SQL > SHOW TABLES;
Empty set (0.0013 sec)
 MySQL  10.0.2.247:33060+ ssl  F1  SQL >
To create a new table with some columns use the following command:
MySQL  10.0.2.247:33060+ ssl  F1  SQL > CREATE TABLE drivers(First_Name VARCHAR(50) NOT NULL,Last_Name VARCHAR(50) NOT NULL,PRIMARY KEY(Last_Name));
Query OK, 0 rows affected (0.0207 sec)
 MySQL  10.0.2.247:33060+ ssl  F1  SQL >
To verify all the tables in the database use the following command:
MySQL  10.0.2.247:33060+ ssl  F1  SQL > DESCRIBE drivers;
+------------+-------------+------+-----+---------+-------+
To create two new records inside the table use the following commands:
MySQL  10.0.2.247:33060+ ssl  F1  SQL > INSERT INTO drivers VALUE ("Max", "Verstappen");
Query OK, 1 row affected (0.0048 sec)
 MySQL  10.0.2.247:33060+ ssl  F1  SQL > INSERT INTO drivers VALUE ("Sergio", "Pérez");
Query OK, 1 row affected (0.0024 sec)
 MySQL  10.0.2.247:33060+ ssl  F1  SQL >
To verify if the two new records are created inside the table use the following command:
MySQL  10.0.2.247:33060+ ssl  F1  SQL > SELECT * FROM drivers;
+------------+------------+
To create a new user and provide the proper privileges for the new database use the following command:
MySQL  10.0.2.247:33060+ ssl  SQL > CREATE USER 'iwan'@'%' IDENTIFIED WITH mysql_native_password BY 'XXX';
Query OK, 0 rows affected (0.0035 sec)
 MySQL  10.0.2.247:33060+ ssl  SQL > GRANT ALL ON F1.* TO 'iwan'@'%';
Query OK, 0 rows affected (0.0037 sec)
 MySQL  10.0.2.247:33060+ ssl  SQL >
Verify if the new user has the proper privileges on the database using the following command:
MySQL  10.0.2.247:33060+ ssl  SQL > SHOW GRANTS FOR 'iwan';
+----------------------------------------------+
To quit the the MySQL Shell I use `\q`.
MySQL  10.0.2.247:33060+ ssl  F1  SQL > \q
Bye!
[opc@ih-webserver-01 ~]$
Now I have a sample database with some sample tables and sample data running inside OCI using the OCI Database MySQL Service. The next step is to retrieve this data using a PHP website.
💡 The PHP website/script with the MySQL data that I used for testing purposes in this article can be found on [my Github page](https://github.com/iwanhoogendoorn/php-mysql-test/).
STEP 06» Install and Configure an NGINX webserver with PHP support
I already have a Compute Instance with NGNIX and PHP in place but if you still need to create a new Instance with NGNIX and PHP, I have explained how to do this in [1] article.
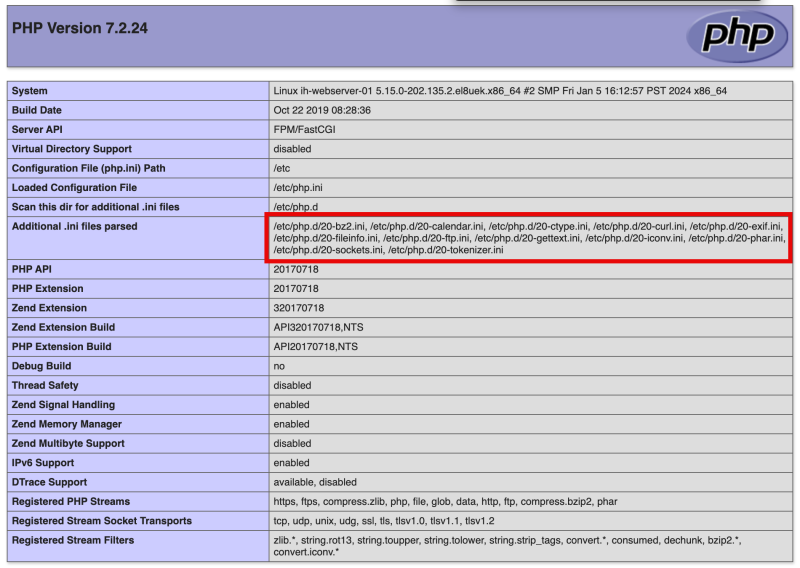
In the previous NGINX + PHP setup I did not install any PHP MySQL modules.
A quick check on my PHP Info page confirms this.
Use the following command to install the PHP MySQL modules so that NGINX and PHP can work together with MySQL:
[opc@ih-webserver-01 html]$ sudo dnf install php php-common php-mysqlnd php-pecl-zip php-gd php-mbstring php-xml php-soap
Last metadata expiration check: 2:28:09 ago on Fri 16 Feb 2024 08:40:17 AM GMT.
Package php-7.2.24-1.module+el8.2.0+5510+6771133c.x86_64 is already installed.
Package php-common-7.2.24-1.module+el8.2.0+5510+6771133c.x86_64 is already installed.
Dependencies resolved.
======================================================================================================================
 Package                Architecture    Version                                          Repository              Size
======================================================================================================================
Installing:
 php-gd                 x86_64          7.2.24-1.module+el8.2.0+5510+6771133c            ol8_appstream           84 k
 php-mbstring           x86_64          7.2.24-1.module+el8.2.0+5510+6771133c            ol8_appstream          581 k
 php-mysqlnd            x86_64          7.2.24-1.module+el8.2.0+5510+6771133c            ol8_appstream          191 k
 php-pecl-zip           x86_64          1.15.3-1.module+el8+5148+a558e3ee                ol8_appstream           51 k
 php-soap               x86_64          7.2.24-1.module+el8.2.0+5510+6771133c            ol8_appstream          177 k
 php-xml                x86_64          7.2.24-1.module+el8.2.0+5510+6771133c            ol8_appstream          189 k
Installing dependencies:
 gd                     x86_64          2.2.5-7.el8                                      ol8_appstream          144 k
 jbigkit-libs           x86_64          2.1-14.el8                                       ol8_appstream           55 k
 libXpm                 x86_64          3.5.12-9.el8_7                                   ol8_appstream           58 k
 libjpeg-turbo          x86_64          1.5.3-12.el8                                     ol8_appstream          157 k
 libtiff                x86_64          4.0.9-29.el8_8                                   ol8_appstream          189 k
 libwebp                x86_64          1.0.0-9.el8_9.1                                  ol8_appstream          273 k
 libzip                 x86_64          1.5.1-2.module+el8.2.0+5510+6771133c             ol8_appstream           63 k
 php-pdo                x86_64          7.2.24-1.module+el8.2.0+5510+6771133c            ol8_appstream          123 k

Transaction Summary
======================================================================================================================
Install  14 Packages

Total download size: 2.3 M
Installed size: 6.1 M
Is this ok [y/N]: y
Downloading Packages:
(1/14): libXpm-3.5.12-9.el8_7.x86_64.rpm                                              253 kB/s
Edit the php.ini file using the following command:
[opc@ih-webserver-01 testocidb]$ sudo nano /etc/php.ini
Make sure this line is uncommented (so that the mysqli.so module can be loaded):
extension=/usr/lib64/php/modules/mysqli.so
Restart the NGINX and PHP services using the following commands:
[opc@ih-webserver-01 testocidb]$ sudo systemctl start php-fpm
[opc@ih-webserver-01 testocidb]$ sudo systemctl restart nginx
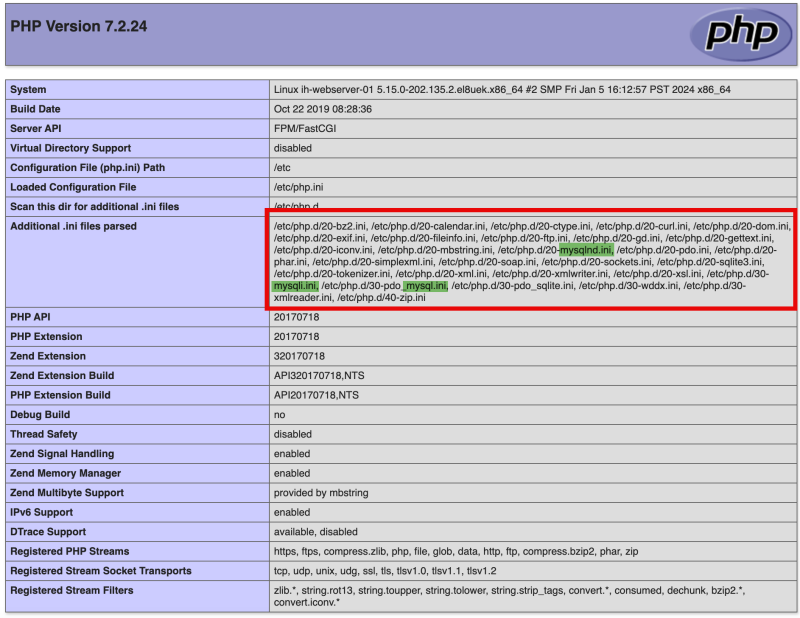
After installing the PHP MySQL modules my PHP Info page is now confirming the PHP MySQL modules are installed.
Because I am using Oracle Linux 8 and this is based on SE Linux, I need to issue the following command to allow my web server (NGINX) to connect and access the OCI MySQL database.
[opc@ih-webserver-01 testocidb]$ sudo setsebool -P httpd_can_network_connect_db=1
I am you do not issue the command above the PHP website may give you errors like :
"Could not connect: Can’t connect to MySQL server"
STEP 07» Create a website that connects to the database and displays the records on a webpage
To change the directory on the webserver to the DEFAULT path for the web server files use the following command:
[opc@ih-webserver-01 ~]$ cd /usr/share/nginx/html/
[opc@ih-webserver-01 html]$ ls -l
total 60
-rw-r--r--. 1 root root   168 Feb  8 07:47 404.php
-rw-r--r--. 1 root root   497 Oct 24 16:50 50x.html
-rw-r--r--. 1 root root     7 Feb  8 09:54 Color
-rw-r--r--. 1 root root  9731 Feb  8 10:18 Iwan-hoogendoorn.logo.png
-rw-r--r--. 1 root root 15406 Feb  8 10:07 favicon.ico
drwxr-xr-x. 2 root root   101 Feb  8 09:59 files
-rw-r--r--. 1 root root     8 Feb  8 09:52 health.html
-rw-r--r--. 1 root root   622 Feb  7 18:13 index.html.original
-rw-r--r--. 1 root root  6504 Feb  8 10:23 index.php
-rw-r--r--. 1 root root    18 Feb  7 19:28 info.php
[opc@ih-webserver-01 html]$
To create a new directory for the new test web page use the following command:
[opc@ih-webserver-01 html]$ sudo mkdir testocidb
[opc@ih-webserver-01 html]$ ls -l
total 60
-rw-r--r--. 1 root root   168 Feb  8 07:47 404.php
-rw-r--r--. 1 root root   497 Oct 24 16:50 50x.html
-rw-r--r--. 1 root root     7 Feb  8 09:54 Color
-rw-r--r--. 1 root root  9731 Feb  8 10:18 Iwan-hoogendoorn.logo.png
-rw-r--r--. 1 root root 15406 Feb  8 10:07 favicon.ico
drwxr-xr-x. 2 root root   101 Feb  8 09:59 files
-rw-r--r--. 1 root root     8 Feb  8 09:52 health.html
-rw-r--r--. 1 root root   622 Feb  7 18:13 index.html.original
-rw-r--r--. 1 root root  6504 Feb  8 10:23 index.php
-rw-r--r--. 1 root root    18 Feb  7 19:28 info.php
drwxr-xr-x. 2 root root     6 Feb 16 09:47 testocidb
[opc@ih-webserver-01 html]$
Change the directory to the newly created directory and create a new `index.php` file.
This file will be my testing website to connect to the OCI database pull the data from the database and display it on the website.
[opc@ih-webserver-01 html]$ cd testocidb/
[opc@ih-webserver-01 testocidb]$ sudo nano index.php
The HTML and PHP code for my testing website can be found below:
If you are using this webpage, make sure you change the database IP, name, username, and password details.
Depending on your database table and data structure you might need to change the code to reflect your example.
[opc@ih-webserver-01 testocidb]$ sudo more index.php
<!DOCTYPE html>
<html lang="en">
<head>
    <meta charset="UTF-8">
    <meta http-equiv="X-UA-Compatible" content="IE=edge">
    <meta name="viewport" content="width=device-width, initial-scale=1.0">
    <title>Database Records</title>
    <style>
        table{
            width: 70%;
            margin: auto;
            font-family: Arial, Helvetica, sans-serif;
        }
        table, tr, th, td{
            border: 1px solid #d4d4d4;
            border-collapse: collapse;
            padding: 12px;
        }
        th, td{
            text-align: left;
            vertical-align: top;
        }
        tr:nth-child(even){
            background-color: #e7e9eb;
        }
    </style>
<body>

<?php
    //storing database details in variables.
    $hostname = "10.0.2.247";
    $username = "iwan";
    $password = "XXX";
    $dbname = "F1";

    //creating connection to database
    $con = mysqli_connect($hostname, $username, $password, $dbname);
    //checking if connection is working or not
    if(!$con)
    {
        die("<p><center>Connection failed! <br></center></p>" . mysqli_connect_error());
    }
    else
    {
        echo "<p><center>Successfully Connected! <br></center></p>";
    }

    //Output Form Entries from the Database
    $sql = "SELECT First_Name, Last_Name FROM drivers";
    //fire query
    $result = mysqli_query($con, $sql);
    if(mysqli_num_rows($result) > 0)
    {
       echo '<table> <tr> <th> First Name </th> <th> Last Name </th> </tr>';
       while($row = mysqli_fetch_assoc($result)){
         // to output mysql data in HTML table format
           echo '<tr > <td>' . $row["First_Name"] . '</td>
           <td>' . $row["Last_Name"] . '</td>';
       }
       echo '</table>';
    }
    else
    {
        echo "0 results";
    }
    // closing connection
    mysqli_close($con);

?>
</body>
</html>
[opc@ih-webserver-01 testocidb]$
When I connected to the website (`/testocidb/index.php`) I was able to access the website successfully and most importantly I was able to see my data stored in the database.
💡 The PHP website/script with the MySQL data that I used for testing purposes in this article can be found on my Github page.
Conclusion
In this article, I created a 2-tier web application where I used an OCI Compute Instance that is public internet facing as the front-end (with PHP and NGINX web server) and a private facing OCI MySQL database with some sample data inside.
After installing the proper PHP (MySQL) modules and creating a database with sample data I was able to successfully access the website and sample data.
