Use 1 public IP address on 2 sites with 2 different ISP's
Today I am going to explain how you can use 1 public IP address on two different sites with 2 complete different ISP's.
Why do you want to do this ...? Well .....
Have you ever tried to share a Usenet account with one of your buddies and came to the conclusion the this is not working because the Usenet provider is only permitting 1 login with 1 IP address? Well same here :-).
You can do 4 things …
- you can find a Usenet Provider that allows account sharing
- you can use a paid VPN service (with multiple VPN accounts) (this can be expensive when you the data you transfer is of high volume)
- you could try to work for this Usenet Provider and change the settings ;-)
- or you can try to find another way (network related) to work around this
Because I want to use 1 of the best Usenet providers (and this provider does not allow account sharing at all) I had to go for the last option.
So I was thinking how I could actually share 1 Usenet account and come from the same IP address.
Well I managed to fool the system and share an account of my favorite Usenet provider and share the cost with a friend of mine named John (We will use his account in this example).
Here is what we briefly used to accomplish this:
- 1 x Internet connection (DSL, 10MB down/1MB up) – John
- 1 x Internet connection (Fibre, 50MB up/down) - Iwan
- 1 x PIX 525 firewall - John
- 1 x ASA 5505 - Iwan
This is how the situation looked like before sharing the account:
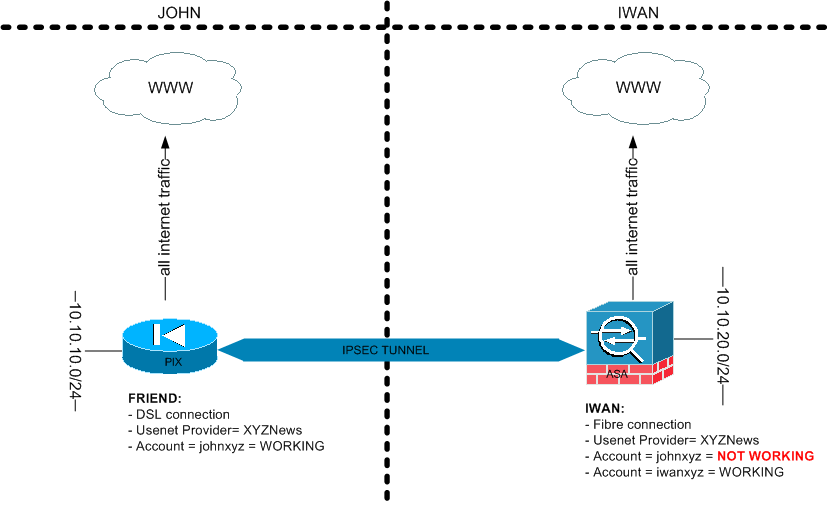 What I actually wanted to accomplish is that we can use the same useraccount “johnxyz” of the usenetprovider “UsenetXYZ” on both locations.
Now the situation above is that we both have the same Usenet provider but I can only login with my own account “iwanxyz” and I want to use the account of John ("johnxyz")
Network details John:
- LAN segment = 10.10.10.0/24
- Using Cisco PIX 525 firewall
- Public IP PIX = 1.1.1.1
Network details Iwan:
- LAN segment = 10.10.20.0/24
- Using Cisco ASA 5505 Firewall
- Public IP ASA = 2.2.2.2
The IP addresses used in this blog article are sample IP addresses and not used in my own production environment ;-)
On both sites the PIX and the ASA have the public IP address of their ISP directly configured on the outside interface.
This is the configuration we used to set up a simple IPSEC tunnel which only permits accessing each others LAN segment. So I am able to access John’s 10.10.10.0/24 LAN segment and he is able to access mine 10.10.20.0/24 LAN segment.
PIX config:
hostname pixfirewall
!
interface Ethernet0
 nameif outside
 security-level 0
 ip address 1.1.1.1 255.255.255.0
!
interface Ethernet1
 nameif inside
 security-level 10
 ip address 10.10.10.254 255.255.255.0
!
access-list outside_1_cryptomap extended permit ip 10.10.10.0 255.255.255.0 10.10.20.0 255.255.255.0
!
access-list inside_nat0_outbound extended permit ip 10.10.10.0 255.255.255.0 10.10.20.0 255.255.255.0
!
global (outside) 1 interface
nat (inside) 0 access-list inside_nat0_outbound
nat (inside) 1 10.10.10.0 255.255.255.0
!
crypto ipsec transform-set ESP-MD5-HMAC esp-3des esp-md5-hmac
crypto ipsec security-association lifetime seconds 28800
crypto ipsec security-association lifetime kilobytes 4608000
crypto ipsec df-bit clear-df outside
!
crypto map outside_map 1 match address outside_1_cryptomap
crypto map outside_map 1 set pfs
crypto map outside_map 1 set peer 2.2.2.2
crypto map outside_map 1 set transform-set ESP-MD5-HMAC
crypto map outside_map 1 set security-association lifetime seconds 3600
crypto map outside_map 1 set security-association lifetime kilobytes 4608000
crypto map outside_map interface outside
crypto isakmp enable outside
!
crypto isakmp policy 5
 authentication pre-share
 encryption 3des
 hash sha
 group 2
 lifetime 86400
crypto isakmp policy 10
 authentication pre-share
 encryption des
 hash sha
 group 2
 lifetime 86400
!
tunnel-group 2.2.2.2 type ipsec-l2l
tunnel-group 2.2.2.2 ipsec-attributes
 pre-shared-key KEYFORTUNNEL
!
end
ASA config:
hostname ASA5505
!
interface Vlan10
 description OUTSIDE
 nameif outside
 security-level 0
 ip address 2.2.2.2 255.255.255.0
!
interface Vlan20
 description INSIDE
 nameif inside
 security-level 100
 ip address 10.11.11.254 255.255.255.0
!
interface Ethernet0/0
 description OUTSIDE
 switchport access vlan 10
!
interface Ethernet0/1
 description INSIDE
 switchport access vlan 20
!
access-list NoNAT_ACL extended permit ip 10.10.20.0 255.255.255.0 10.10.10.0 255.255.255.0
access-list crypto extended permit ip 10.10.20.0 255.255.255.0 10.10.10.0 255.255.255.0
!
global (outside) 1 interface
nat (inside) 0 access-list NoNAT_ACL
!
crypto ipsec transform-set ESP-MD5-HMAC esp-3des esp-md5-hmac
!
crypto ipsec df-bit clear-df outside
!
crypto map vpn 10 match address crypto
crypto map vpn 10 set pfs
crypto map vpn 10 set peer 1.1.1.1
crypto map vpn 10 set transform-set ESP-MD5-HMAC
!
crypto map vpn interface outside
crypto isakmp enable outside
!
crypto isakmp policy 10
 authentication pre-share
 encryption 3des
 hash sha
 group 2
 lifetime 86400
crypto isakmp policy 20
 authentication pre-share
 encryption 3des
 hash md5
 group 2
 lifetime 86400
!
group-policy GP-site-2-site-john internal
group-policy GP-site-2-site-john attributes
 vpn-tunnel-protocol IPSec l2tp-ipsec
!
tunnel-group 1.1.1.1 type ipsec-l2l
tunnel-group 1.1.1.1 general-attributes
 default-group-policy GP-site-2-site-john
tunnel-group 1.1.1.1 ipsec-attributes
 pre-shared-key KEYFORTUNNEL
!
end
The configuration above is just the plain configuration to get the PIX and ASA working with an internet connection and to make the IPSEC VPN tunnel working.
Once this is done I am able to access my John’s 10.10.10.0/24 LAN segment and he is able to access mine 10.10.20.0/24 LAN segment.
Because I (Iwan) am the one with a better internet connection (50MB up/down fibre) we are going to use John's Usenet account and I am going to let him use my public IP address to download binary articles with his own account which he will share with me. I already have my public IP address so I don’t have to worry about that ;-)
The trick is to route the IP address that the news Provider is using trough the tunnel (from John’s side to Iwan side) and translate this on the ASA to my (Iwan) public IP address.
To test if the method is actually going to work we can try to test this with a website first.
A website like http://whatismyipaddress.com/ shows the public IP address you are coming from.
To translate this domain name to a IP address we use the nslookup tool:
C:\>nslookup whatismyipaddress.com
Server:  dns-server
Address:  10.10.20.20
Non-authoritative answer: Name: whatismyipaddress.com Address: 140.239.191.10
To accomplish that John can access http://whatismyipaddress.com we are going:
- to route the IP address 140.239.191.10 trough the IPSEC tunnel
- translate this traffic to my public IP address
Here is the config to accomplish this with a little explanation:
PIX config:
 !<-- SEND THIS IP ADDRESS TROUGH THE TUNNEL -->
access-list outside_1_cryptomap extended permit ip 10.10.10.0 255.255.255.0 host 140.239.191.10
!<-- NONAT THIS TRAFFIC BECAUSE IT’S GOING TROUG THE TUNNEL -->
access-list inside_nat0_outbound extended permit ip 10.10.10.0 255.255.255.0 host 140.239.191.10
ASA config:
 <--ENABLE HAIRPINNING>
same-security-traffic permit intra-interface
!<-- SEND THIS IP ADDRESS BACK TROUGH THE TUNNEL -->
access-list crypto extended permit ip host 140.239.191.10 10.10.10.0 255.255.255.0
!
<-- NAT ACL FOR NATTING TO IWAN’S PUBLIC IP ADDRESS -->
access-list NEWSPROVIDER-NAT-RULE extended permit ip 10.10.10.0 255.255.255.0 host 140.239.191.10
!
<-- THE ACTUAL NAT COMMAND -->
nat (outside) 1 access-list NEWSPROVIDER-NAT-RULE
This is a small explanation about the harpinning feature:
Same-security-traffic permit intra-interface:
The security appliance includes a feature that lets a VPN client send IPSec-protected traffic to another VPN user by allowing such traffic in and out of the same interface. Also called “hairpinning”, this feature can be thought of as VPN spokes (clients) connecting through a VPN hub (Security appliance).
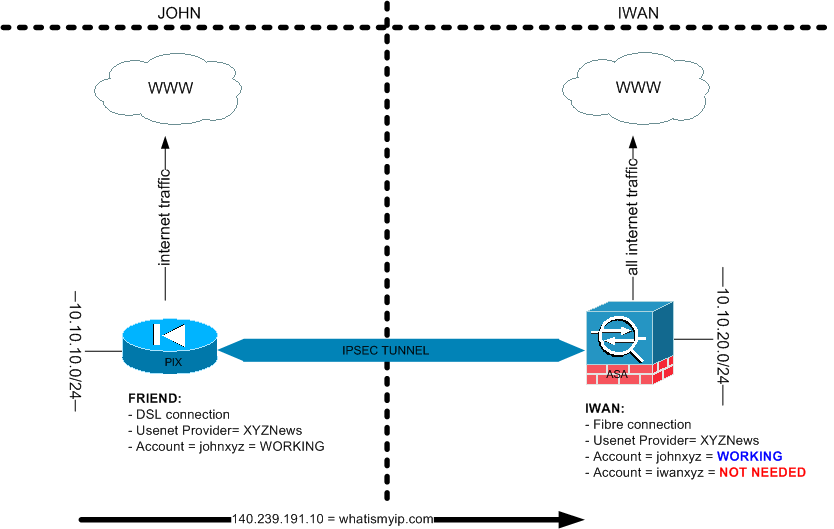
Once all of this is configured John can go to an internet browser and type in http://whatismyipaddress.com he will now see that his ISP IP address is 2.2.2.2 in stead of 1.1.1.1. This means he is accessing this website trough my internet connection.
Once this works you can also replace the 140.239.191.10 ip address for other hosts for example to 1 of your newsgroup providers. (Which does not permit account sharing) ;-)
You can use this trick on all Newsgroup providers that are not allowing account sharing.
The final drawing will look like this:
I would like to thanks you again for reading my blog post and if you have any questions just ask these below or contact me.