Using OCI to publish an webserver that is accessible from the internet (with IPv6)
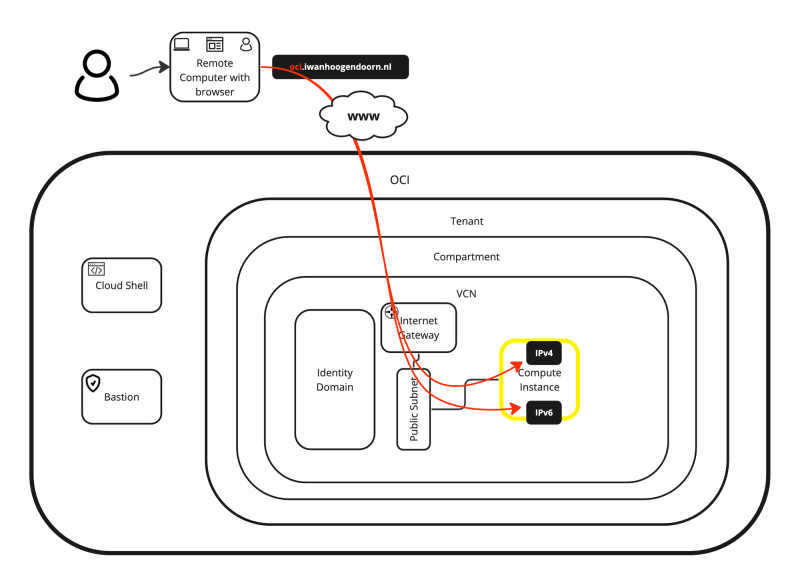
In this article, I am going to explain how I create a webserver (OCI Instance) within OCI and I will make this webserver accessible from the internet. To spice things up a bit more I am not only going to make this webserver accessible from its public IPv4 address, but I am also going to make it accessible from the public IPv6 address (with the DNS records (FQDN) fully configured).
The Steps
- STEP 01: Create a new VCN (with IPv6 enabled)
- STEP 02: Create a new Subnet (with IPv6 enabled)
- STEP 03: Create a new Instance (with IPv6 enabled)
- STEP 04: Create a new Internet Gateway and configure routing
- STEP 05: Open HTTP and HTTPS on the (default) Security List
- STEP 06: Install a web server on this instance
- STEP 07: Configure DNS records
- STEP 08: Create a custom website (with NGINX and PHP)
- STEP 09: Test the web server (from the internet)
STEP 01» Create a new VCN with IPv6 enabled
The first thing I will do is create a new VCN.
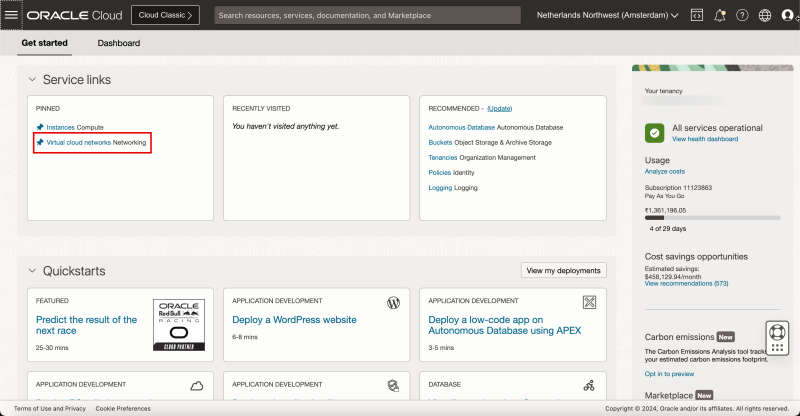
When you have opened the hamburger menu click on “Virtual Cloud Networking”.
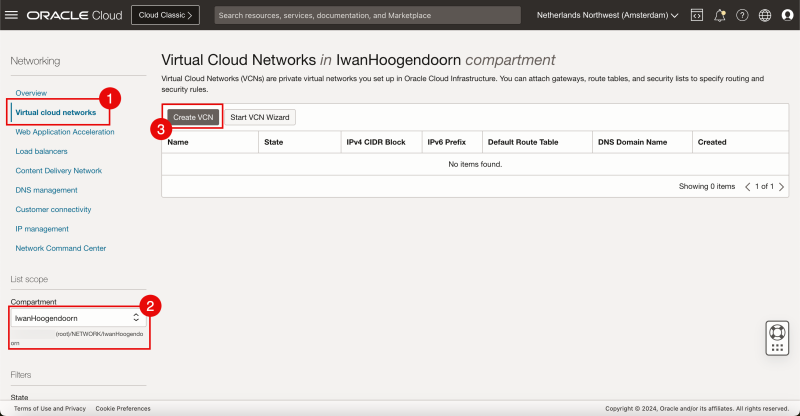
- Make sure you select “Virtual Cloud Networks” in the menu.
- Select the right compartment that you want to work in.
- If you have not set up the compartment just use the root compartment
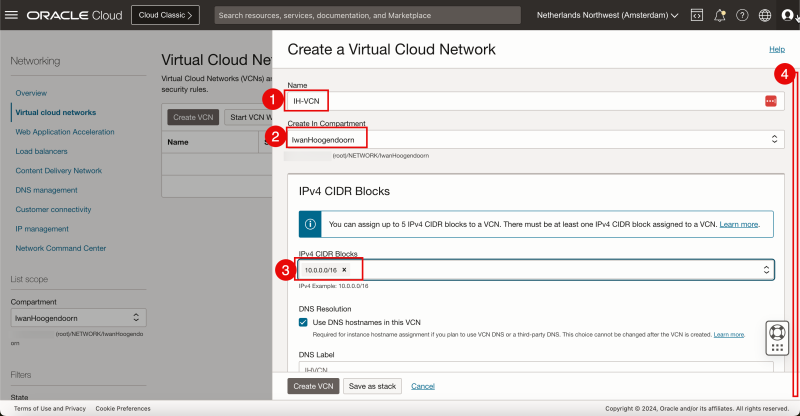
- Click on “Create VCN”.
- Provide a VCN Name.
- Select the compartment again (if that is not already pre-populated).
- Specify the IPv4 CIDR that I want to use inside this VCN.
- I make sure I use a /16 CIDR because my IPv4 Subnets (typically /24’s) will be carved out of this CIDR clock.
- Scroll Down.
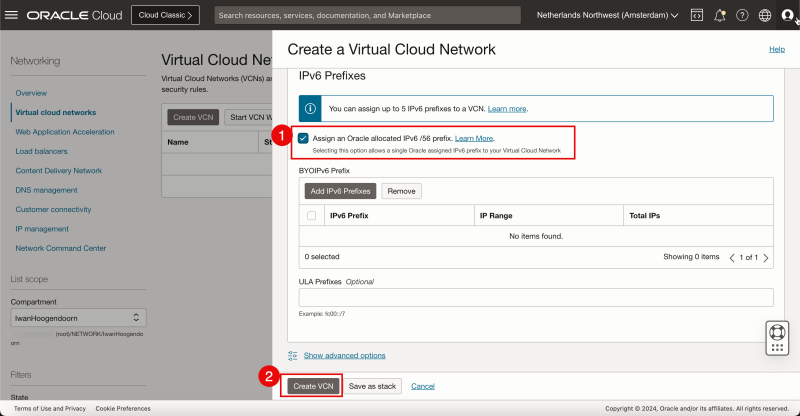
- For IPv6 I will assign an Oracle-allocated prefix. So check the box “Assign an Oracle allocated /56 prefix”.
- Click on “Create VCN”.
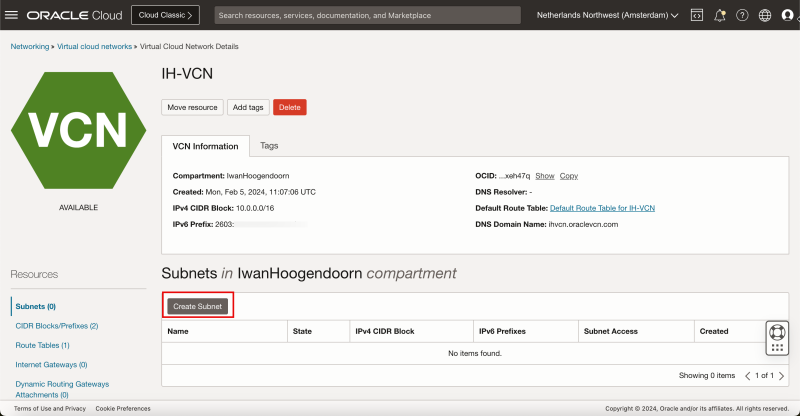
I have now created a new VCN with new IPv4 and IPv6 network spaces that I can use to carve my IPv4 and IPv6 subnets.
STEP 02» Create a new Subnet with IPv6 enabled
Click on “Create Subnet”.
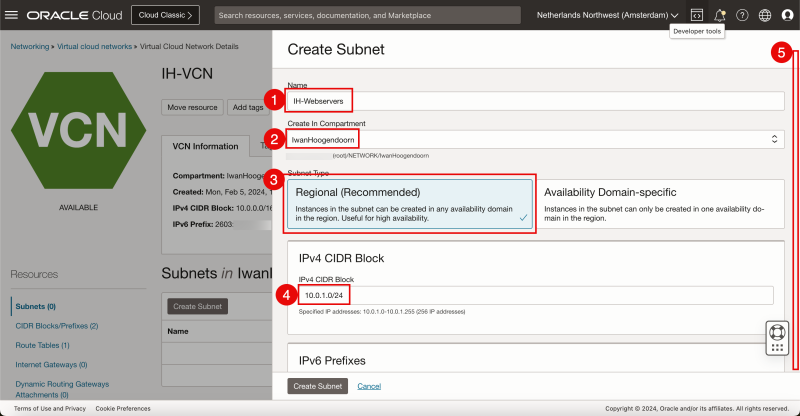
- Specify a Name for the new subnet.
- Select the compartment that this subnet needs to be in (if that is not already pre-populated).
- For the Subnet Type, I will select “Regional” for now.
- Specify the IPv4 subnet that I will carve out of the CIDR block I have assigned in the VCN.
- Make sure the new /24 CIDR block falls within the /16 that was determined in the VCN.
- Scroll down.
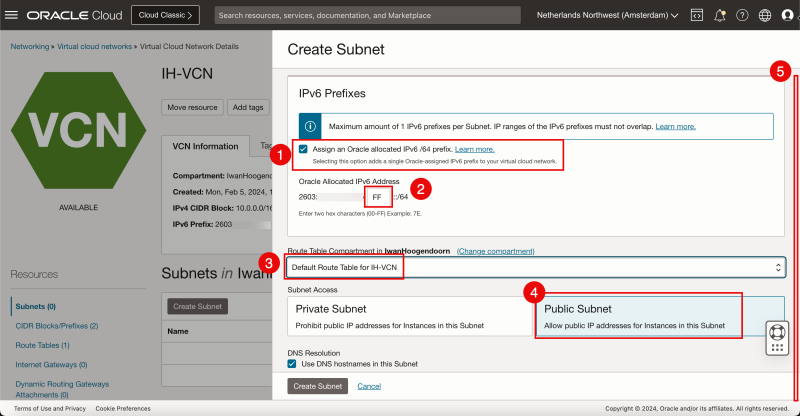
- For IPv6 I will assign an Oracle-allocated prefix. So check the box “Assign an Oracle allocated /64 prefix”.
- Specify a new HEX decimal to complete the Oracle-allocated prefix.
- Select the default route table for the VCN.
- Make the subnet Public, so that we get public (internet routable) IP addresses as I need this to make my webserver accessible from the internet.
- Scroll down.
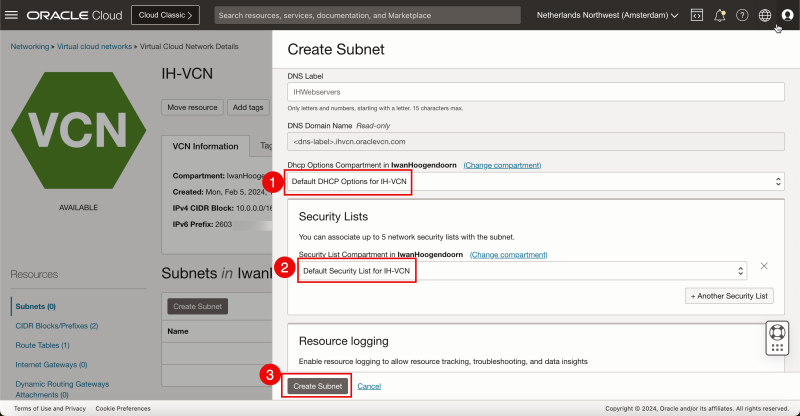
- Select the default DHCP options for the VCN.
- Select the default Security List for the VCN.
- Click on Create Subnet.
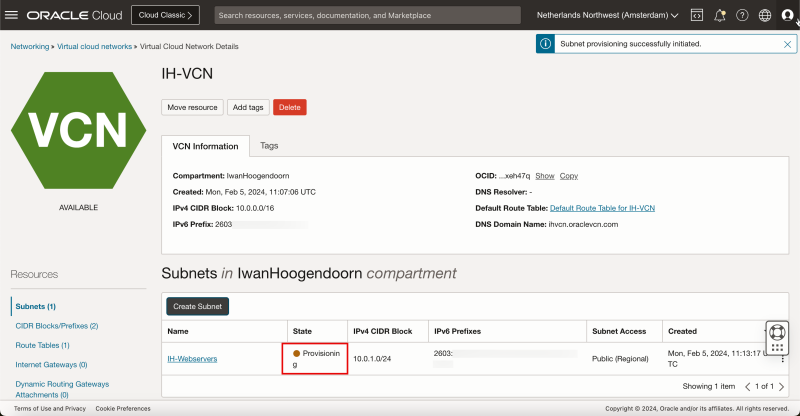
Notice that the state of the newly created subnet is “Provisioning”.
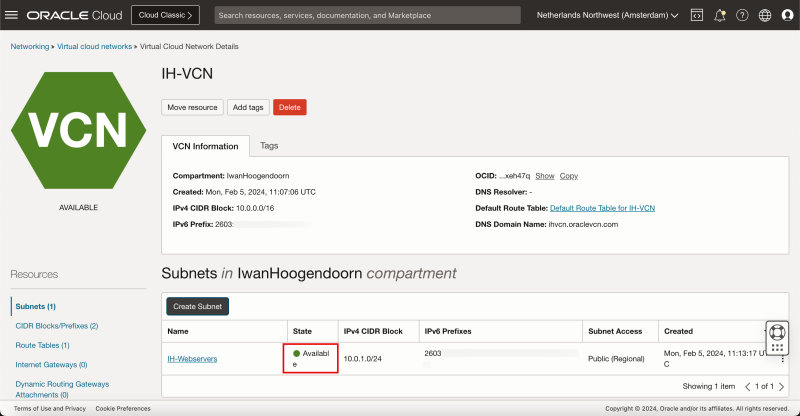
Eventually, the state of the new subnet will be “Available”.
Now the subnet is ready to use for IPv4 and IPv6 addresses.
STEP 03» Create a new Instance with IPv6 enabled
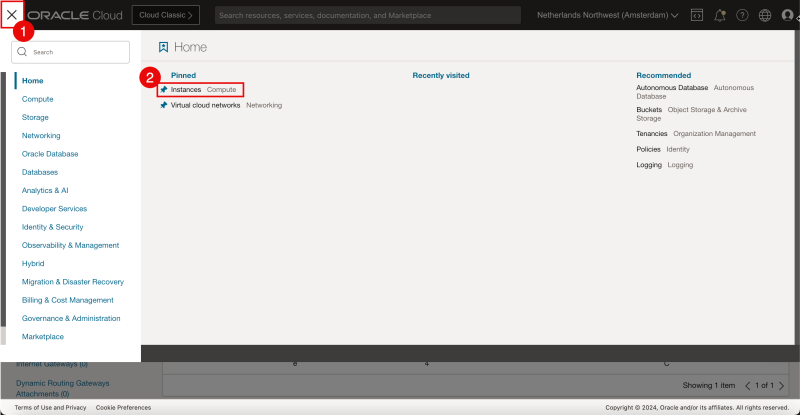
- Click on the hamburger menu in the top left corner.
- Select “Instances” from the Pined section.
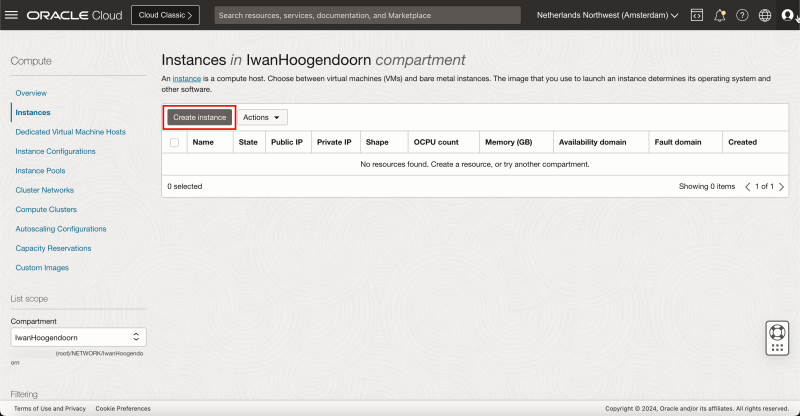
Click on “Create Instance”.
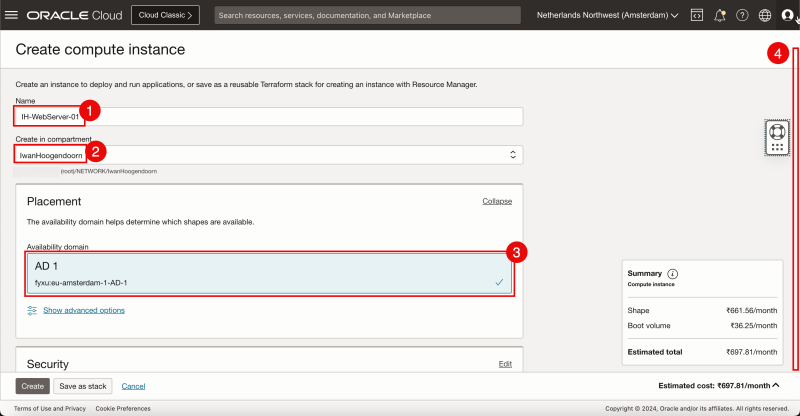
- Specify the Name for the instance.
- Select the compartment that this Instance needs to be in.
- Select in what Availability Domain you want to place this Instance in.
- As the Northwest Region of The Netherlands only has one Availability Domain there is not much choice left.
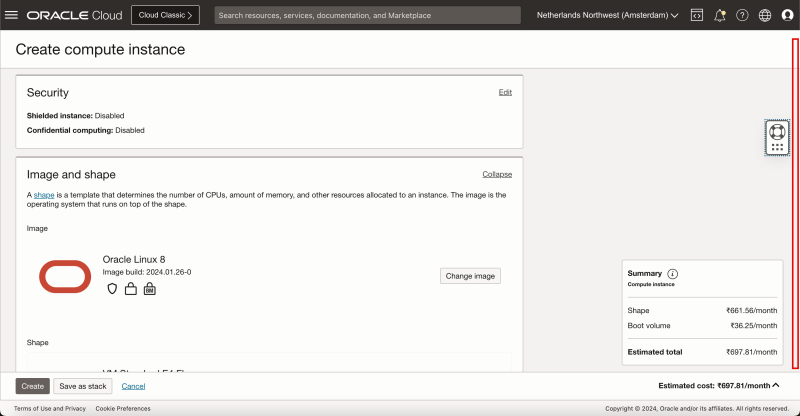
- Scroll Down.
Leave everything default and scroll down.
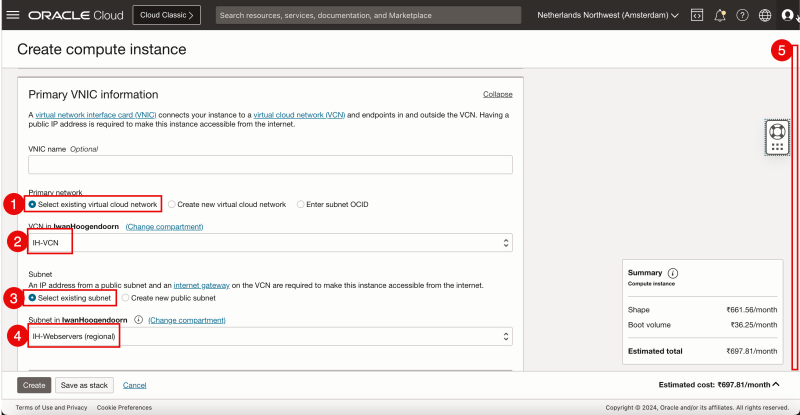
- For the Primary network select “Select existing virtual cloud network”.
- I selected the VCN that I created earlier.
- For the subnet select “Select existing subnet”.
- I select the subnet that I created earlier.
- Scroll Down.
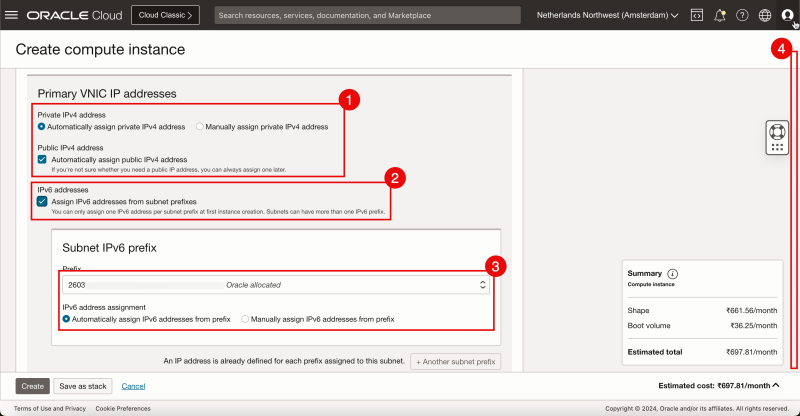
- For the Private IPv4 address select “Automatically assign private IPv4 address”. The box also needs to be checked.
- For the IPv6 address select “Assign IPv6 addresses from subnet prefix” (that was configured during subnet creation).
- For the IPv6 address assignment select “Automatically assign private IPv6 address from prefix”.
- Scroll Down.
- In order the access and manage this Linux Instance you need to work with SSH Keys. For now, I will let OCI Generate a new SSH Key pair.
- Download the private and public keys on your local computer so I can use these to access and manage this Linux Instance (after creation).
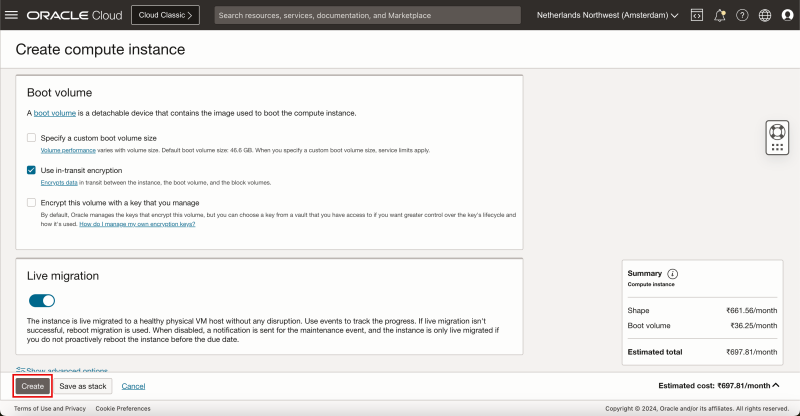
Click on “Create” to create the Instance.
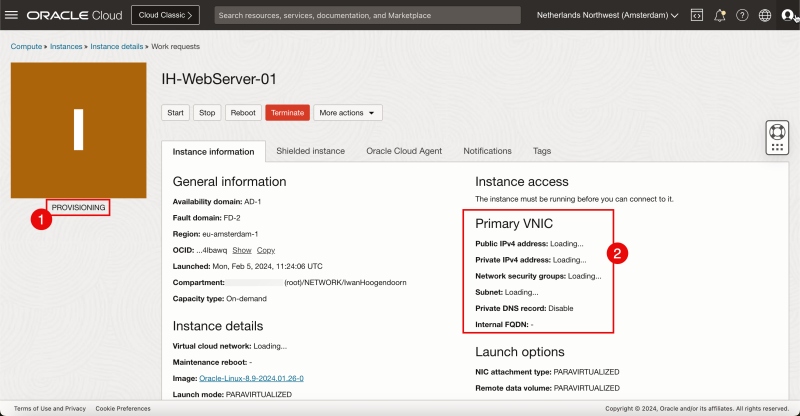
- During creation, the state of the instance will be “PROVISIONING”.
- Notice that there are no IP address details available yet.
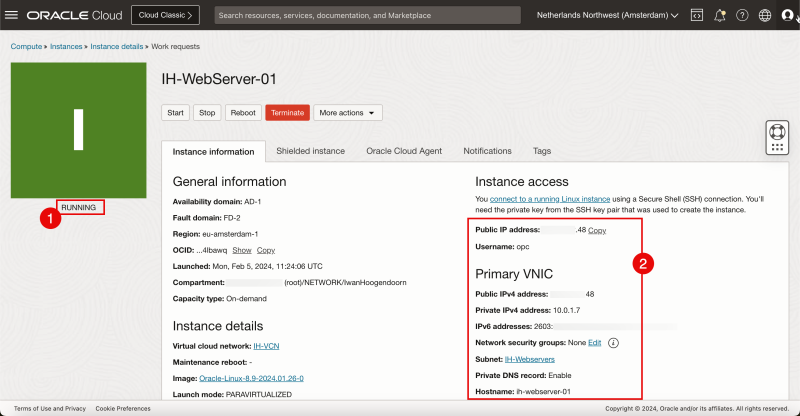
- When the Instance is fully created and ready the state will be set to “RUNNING”.
- Notice that the IP address details are available now.
The next logical step would be to access the Instance using SSH so I can start installing and configuring my web server. When I try to connect to the webserver (using my public IPv4 address) and the private key I am not able to connect yet. Why? Because in the VCN I created there is no Internet Gateway created and I now first need to create that Internet Gateway (in the VCN) and also configure routing.
STEP 04» Create a new Internet Gateway and configure routing
To access my new instance (webserver) from the internet (now with SSH and in the future with HTTP) I need to create an Internet Gateway.
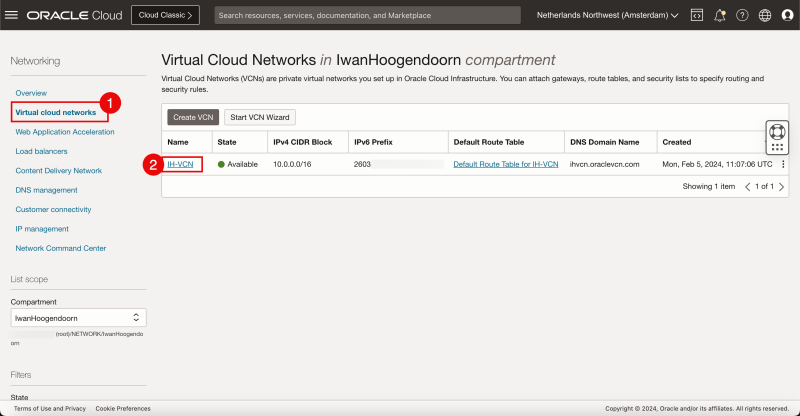
- Go to the Virtual Cloud Networks section in the OCI Console
- Select the VCN that was previously created.
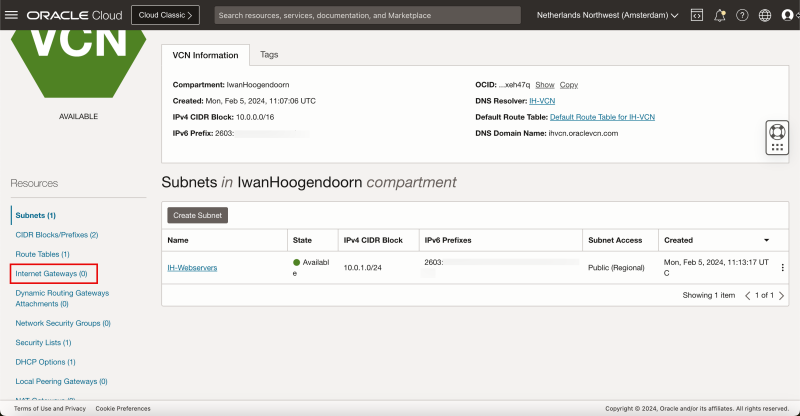
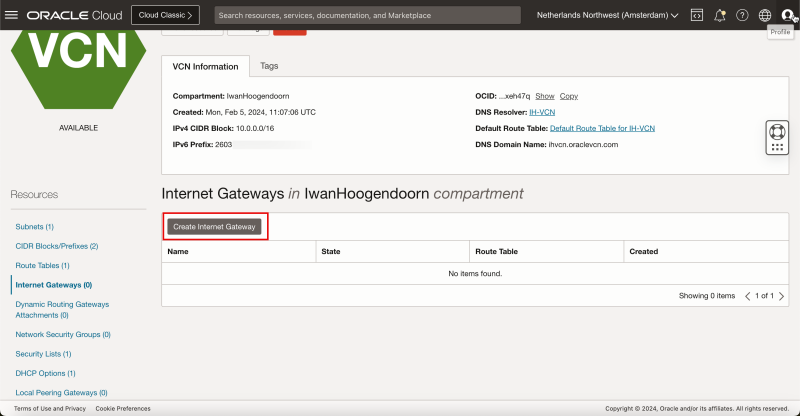
Inside the VCN click on “Internet Gateways”.
Click on the “Create Internet” Gateway.
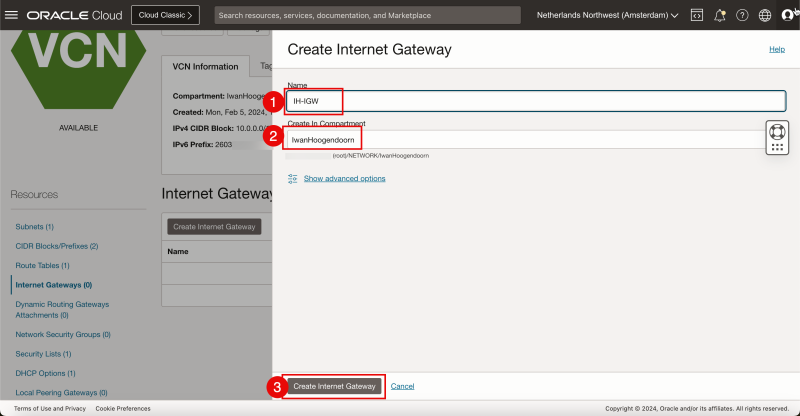
- Specify the name.
- Select the Compartment.
- Click on “Create Internet Gateway”.
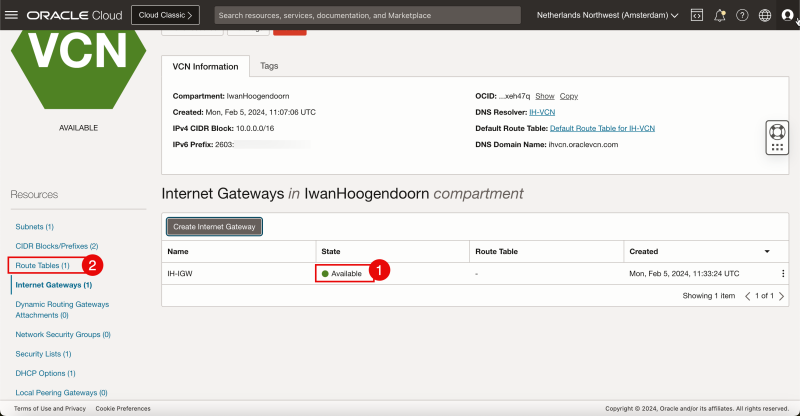
- Notice that the Internet Gateway is “Available”.
- Click on “Route Tables”.
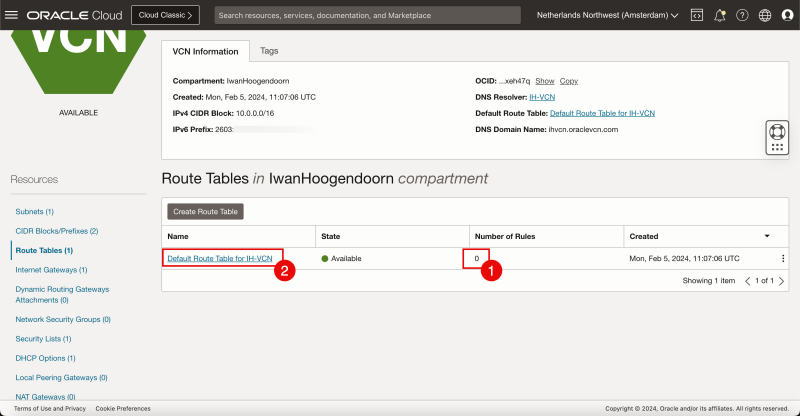
- Notice that the “Default Route Table” has a “0” in the number of rules.
- Click on the “Default Route Table”.
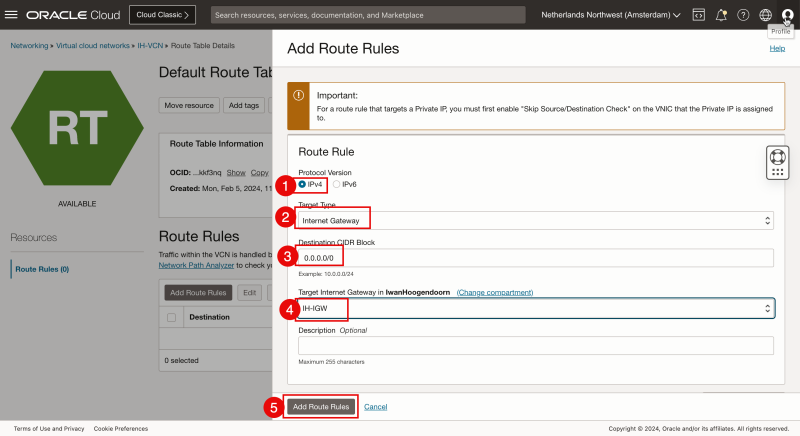
- Select “IPv4” as the protocol.
- Select the “Target Type” as Internet Gateway.
- For the “destination CIDR Block,” I specify 0.0.0.0/0 as I want ALL my default IPv4 network traffic to go to the Internet Gateway.
- Select the “Target Internet Gateway” that was just created.
- Click on “Add Route Rules”
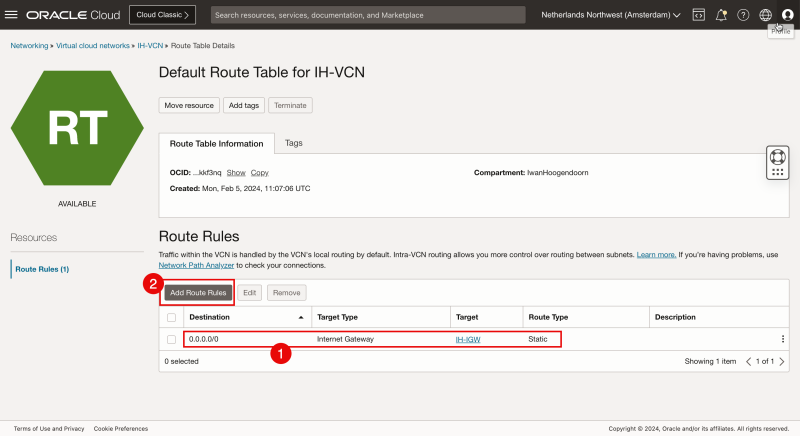
- Notice that the new IPv4 default route rule has been created.
- To also route IPv6 internet traffic I also need to create a new IPv6 Default Internet Rule. Click on “Add Route Rules” again.
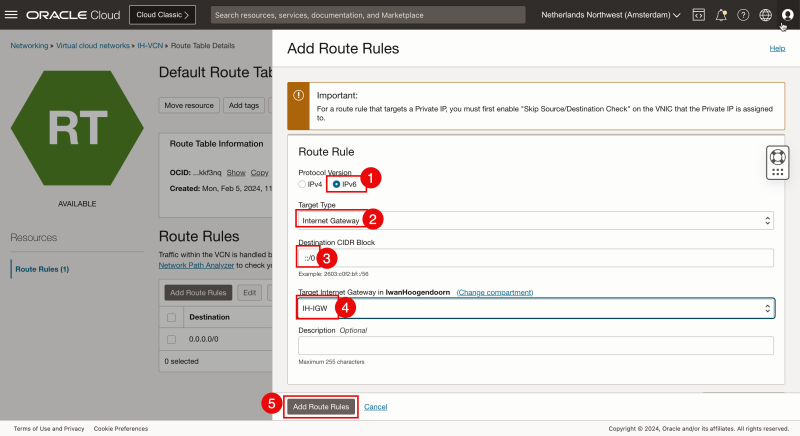
- Select “IPv6” as the protocol.
- Select the “Target Type” as Internet Gateway.
- For the “destination CIDR Block,” I specify ":/0" as I want ALL my default IPv6 network traffic to go to the Internet Gateway.
- Select the “Target Internet Gateway” that was just created.
- Click on “Add Route Rules”
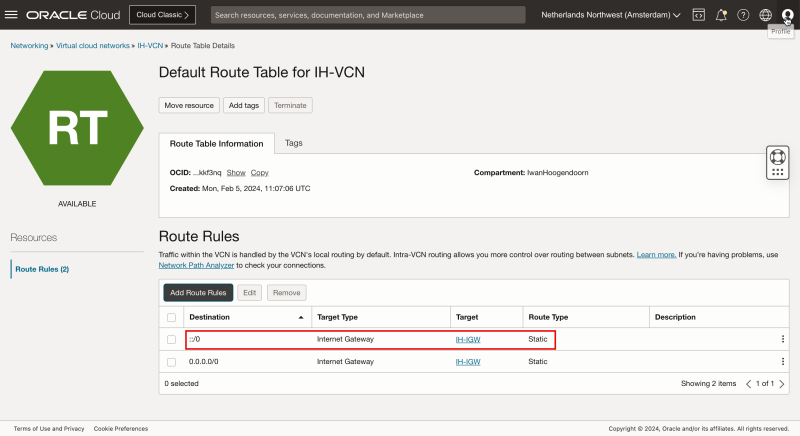
Notice that the new IPv6 default route rule has been created.
- Now I connect to my newly created instance through SSH using my private key.
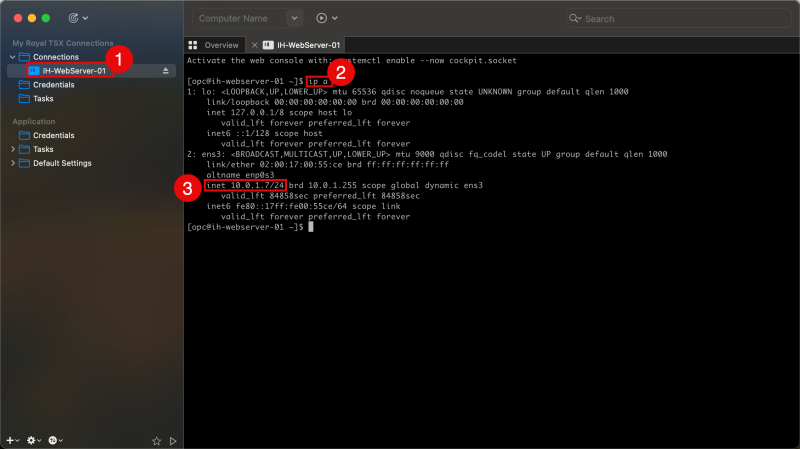
- After the connection has been established successfully I issue the command “ip a” to verify my IP addresses.
- Notice that the private IPv4 address is the same as was provided in the instance details.
- I also test the connection using my OSX CLI terminal.
- After the connection has been established successfully I issue the command “ip a” to verify my IP addresses.
- Notice that the private IPv4 address is the same as was provided in the instance details (in the OCI Console).
One thing that pops out here is that the Instance does not have the IPv6 address that was provided on the instance details (in the OCI Console).
The commands that I used can be found below.
ssh -i ssh-key-2024-02-05.key opc@xxx.xxx.xxx.48

ip a
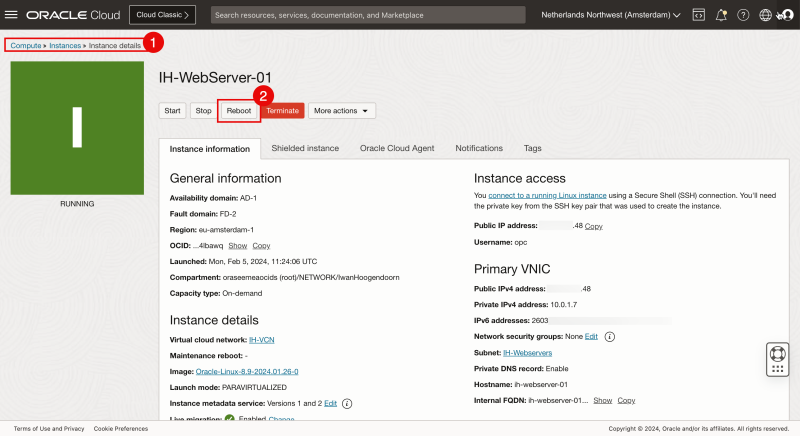
This was fixed by doing a Reboot of the Instance.
- Navigate to the instance.
- Click on “Reboot”.
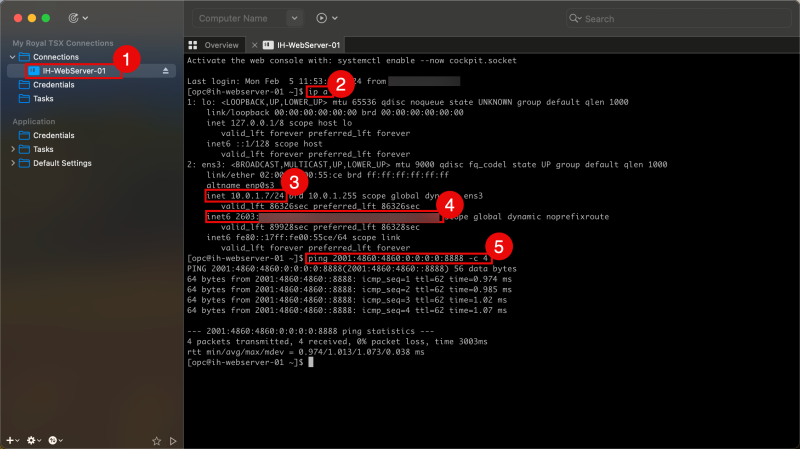
- Now I connect to the instance again through SSH using my private key.
- After the connection has been established successfully I issue the command “ip a” to verify my IP addresses.
- Notice that the private IPv4 address is the same as was provided in the instance details.
- Notice that the private IPv6 address is the same as was provided in the instance details.
- To test connectivity to the Internet I also do a ping to the IPv6 IP address of one of Google's DNS servers.
- I also do a quick test to see if I can connect to my Instance using my IPv6 address.
- After the connection has been established successfully I issue the command “ip a” to verify my IP addresses.
- Notice that the private IPv4 address is the same as was provided in the instance details.
- Notice that the private IPv6 address is the same as was provided in the instance details.
The commands that I used can be found below.
ssh -i ssh-key-2024-02-05.key opc@2603:xxxx:xxxx:xxxx:xxxx:xxxx:xxxx:xxxx

ip a
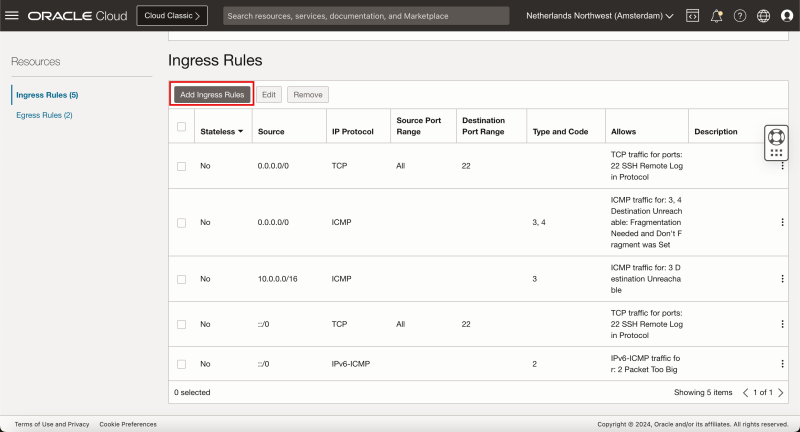
STEP 05» Open HTTP and HTTPS on the default Security List
When a new VCN is created a default Security List is applied to the subnets inside that VCN.
By default, ICMP and SSH are permitted inbound (ingress).
I need to add HTTP and HTTP to that list to allow for incoming traffic for my webserver.
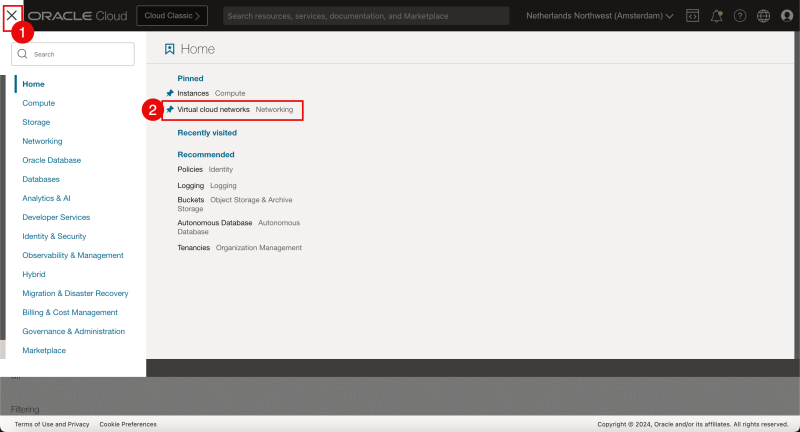
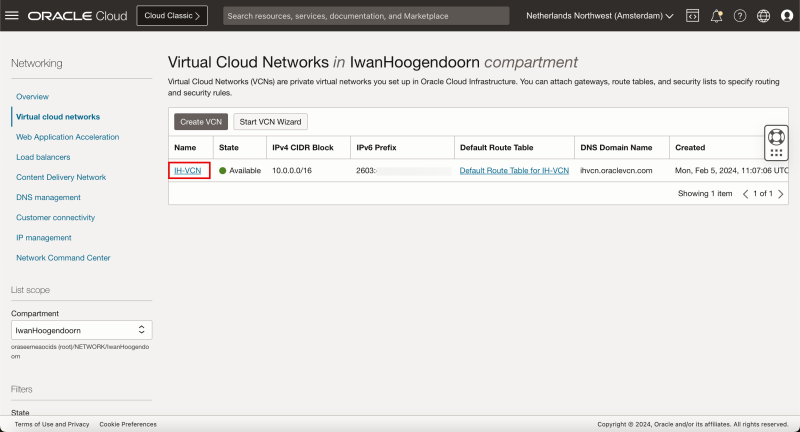
Click on the upper left hamburger menu, and select “Virtual cloud networks” in the pinned section.
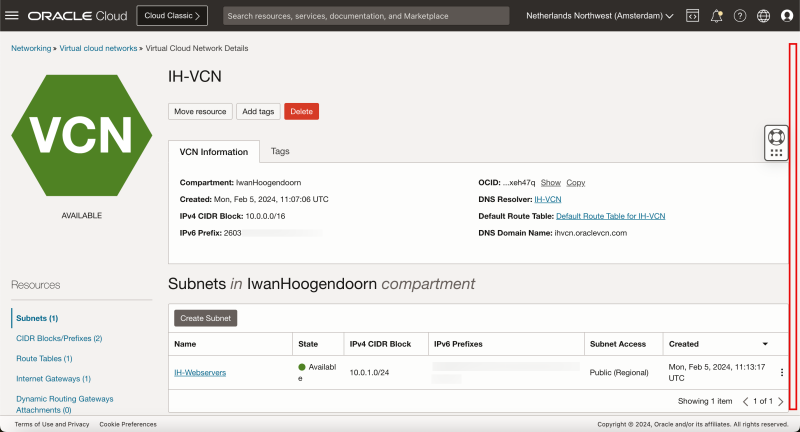
Click on the VCN that was created earlier.
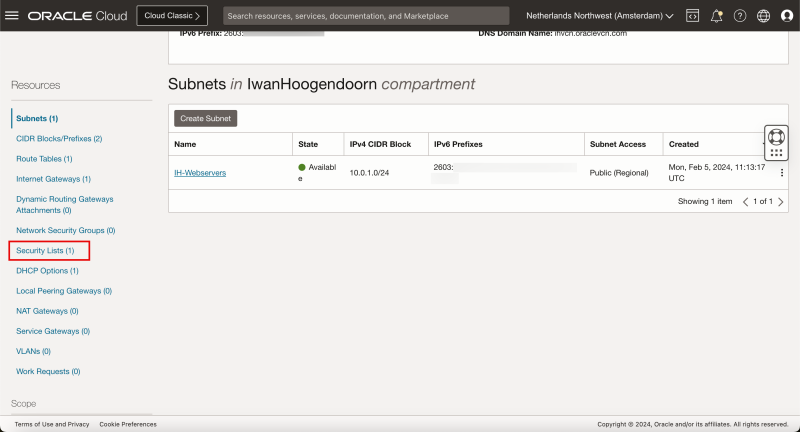
Scroll down.
Click on “Security Lists”.
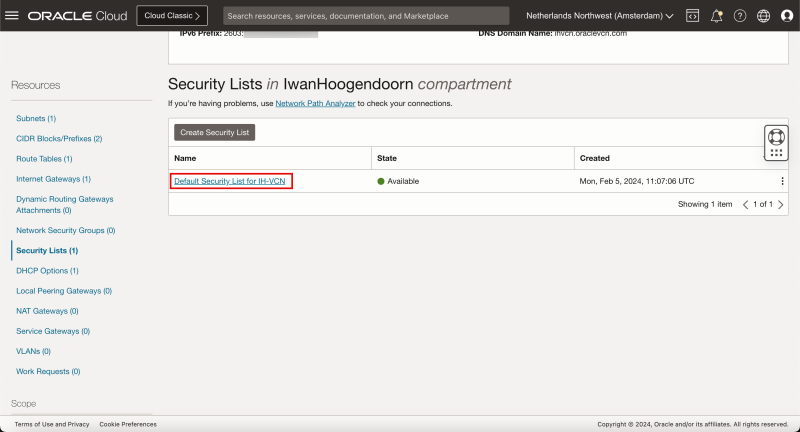
Click on the “Default” Security List.
Click on “Add Ingress Rules”.
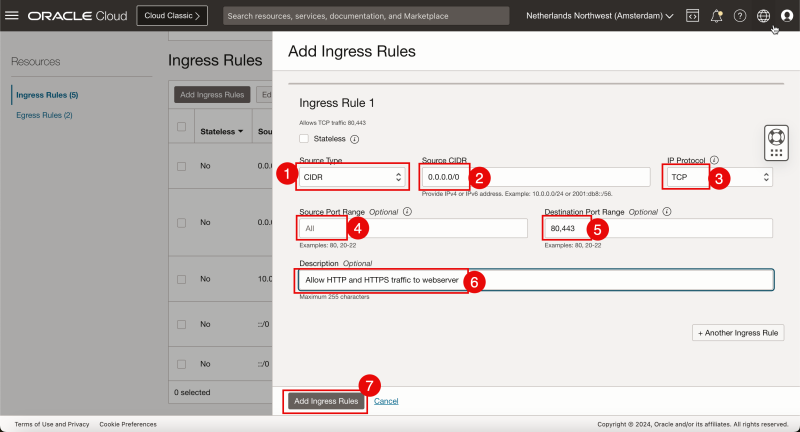
To add new security rules for IPv4 network traffic:
- Select the “Source Type” to be CIDR.
- Specify the “source CIDR” to be 0.0.0.0/0.
- Specify the “IP Protocol” to be TCP.
- Leave the “Source Port Range” default (All).
- Specify the “Destination Port Range” to be 80,443 (HTTP and HTTPS).
- Specify a “Description”.
- Click on “Add Ingress Rules”.
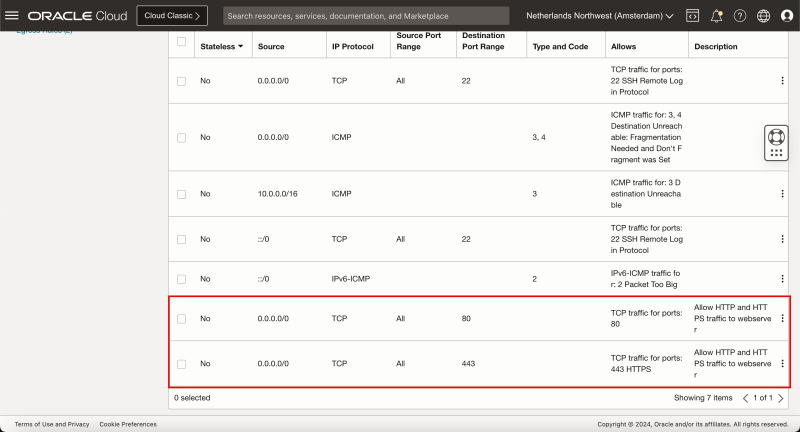
Review the IPv4 “Security Rules” to allow HTTP and HTTPS traffic inbound.
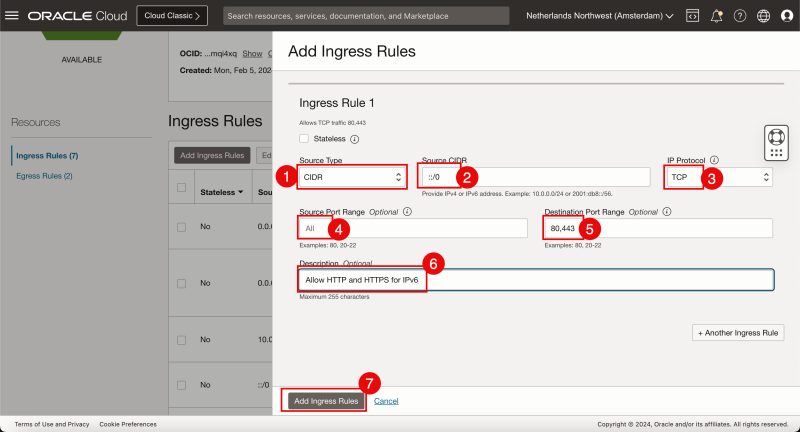
To add new security rules for IPv6 network traffic create new ingress rules by clicking on “Add Ingress Rules” again:
- Select the “Source Type” to be CIDR.
- Specify the “source CIDR” to be "::/0".
- Specify the “IP Protocol” to be TCP.
- Leave the “Source Port Range” default (All).
- Specify the “Destination Port Range” to be 80,443 (HTTP and HTTPS).
- Specify a “Description”.
- Click on “Add Ingress Rules”.
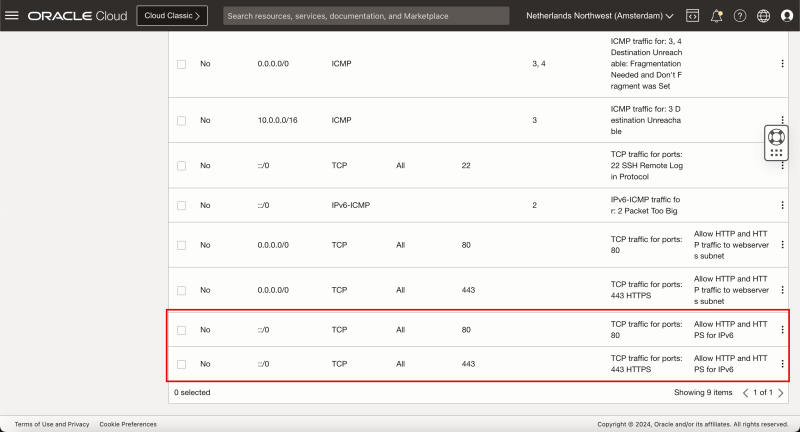
Review the IPv6 “Security Rules” to allow HTTP and HTTPS traffic inbound.
Now that the security rules are in place and IPv4 and IPv6 traffic is allowed on the VCN Subnets I will install the webserver application on the Instance.
STEP 06» Install a webserver on this instance
Before I install the webserver application I quickly validate if my firewall ports are configured correctly.
I use the following website for this (as I am too lazy to set up NMAP on my Mac).
The website has an IPv6 Online Port Scanner, but you can also put in IPv4 addresses.
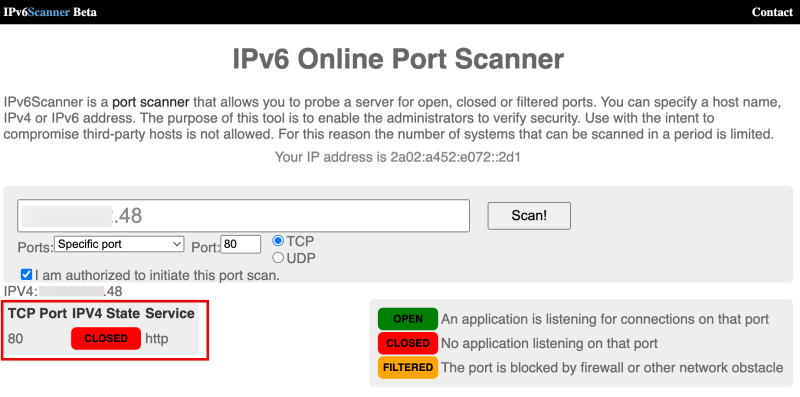
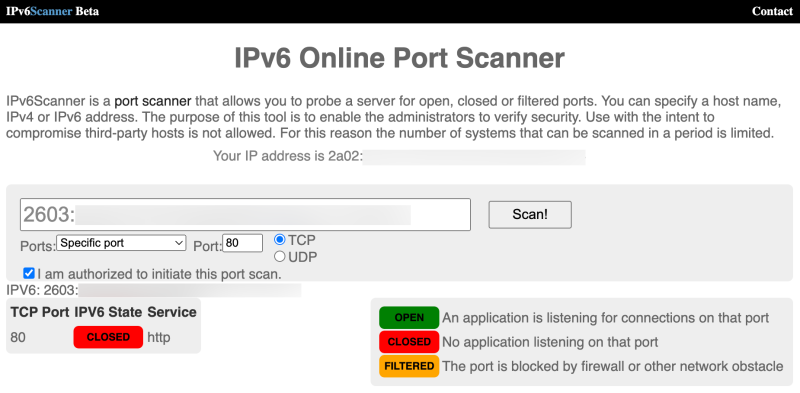
Input the IPv4 address with the details on the picture to perform the scan on TCP port 80.
Notice that this state is CLOSED as the web server application is not installed yet.
Also, notice that the state is not FILTERED as I have added the rules to the Default Security List.
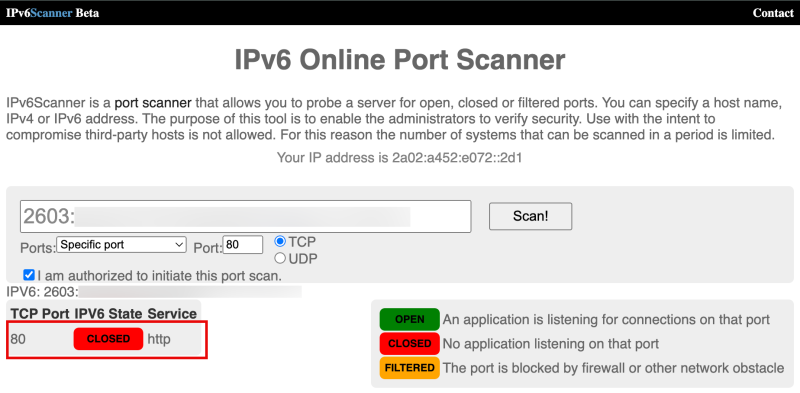
For IPv6 I do the same thing but now I specify the IPv6 address.
The output is the same for the same reasons.
On the web server Instance terminal console (Console or SSH).
Specify the following commands to update the DNF as a software package manager and to install DNF utils.
[opc@ih-webserver-01 ~]$ sudo dnf update -y
[opc@ih-webserver-01 ~]$ sudo dnf install dnf-utils -y
Edit the `nginx.repo` file to specify the details to download and install the NGINX web server application.
[opc@ih-webserver-01 ~]$ sudo nano /etc/yum.repos.d/nginx.repo
Copy/Paste in the content of the below code in the `nginx.repo` file.
[nginx-stable]
name=nginx stable repo
baseurl=http://nginx.org/packages/centos/$releasever/$basearch/
gpgcheck=1
enabled=1
gpgkey=https://nginx.org/keys/nginx_signing.key
module_hotfixes=true

[nginx-mainline]
name=nginx mainline repo
baseurl=http://nginx.org/packages/mainline/centos/$releasever/$basearch/
gpgcheck=1
enabled=0
gpgkey=https://nginx.org/keys/nginx_signing.key
module_hotfixes=true
Verify the content of the `nginx.repo` file.
[opc@ih-webserver-01 ~]$ sudo more /etc/yum.repos.d/nginx.repo
[nginx-stable]
name=nginx stable repo
baseurl=http://nginx.org/packages/centos/$releasever/$basearch/
gpgcheck=1
enabled=1
gpgkey=https://nginx.org/keys/nginx_signing.key
module_hotfixes=true

[nginx-mainline]
name=nginx mainline repo
baseurl=http://nginx.org/packages/mainline/centos/$releasever/$basearch/
gpgcheck=1
enabled=0
gpgkey=https://nginx.org/keys/nginx_signing.key
module_hotfixes=true
[opc@ih-webserver-01 ~]$
By default, the repository for stable Nginx packages is used. To use mainline Nginx packages, run the following command:
[opc@ih-webserver-01 ~]$ sudo yum-config-manager --enable nginx-mainline
Install the NGINX web server application.
[opc@ih-webserver-01 ~]$ sudo dnf install nginx
Start the NGINX web server application.
[opc@ih-webserver-01 ~]$ sudo systemctl start nginx
When the installation is complete, enable Nginx (to start automatically upon system boot), and start the webserver.
[opc@ih-webserver-01 ~]$ sudo systemctl enable nginx
Created symlink /etc/systemd/system/multi-user.target.wants/nginx.service → /usr/lib/systemd/system/nginx.service.
Verify the status of the NGINX web server application (if it’s running correctly).
[opc@ih-webserver-01 ~]$ systemctl status nginx
● nginx.service - nginx - high performance web server
   Loaded: loaded (/usr/lib/systemd/system/nginx.service; enabled; vendor preset: disabled)
   Active: active (running) since Tue 2024-02-06 08:58:43 GMT; 2min 47s ago
     Docs: http://nginx.org/en/docs/
 Main PID: 43323 (nginx)
    Tasks: 3 (limit: 99901)
   Memory: 2.8M
   CGroup: /system.slice/nginx.service
           ├─43323 nginx: master process /usr/sbin/nginx -c /etc/nginx/nginx.conf
           ├─43324 nginx: worker process
           └─43325 nginx: worker process

Feb 06 08:58:43 ih-webserver-01 systemd[1]: Starting nginx - high performance web server...
Feb 06 08:58:43 ih-webserver-01 systemd[1]: Started nginx - high performance web server.
[opc@ih-webserver-01 ~]$
Verify the version of the NGINX web server application.
[opc@ih-webserver-01 ~]$ nginx -v
nginx version: nginx/1.25.3
[opc@ih-webserver-01 ~]$
`firewalld` is a zone-based (personal) firewall that is installed on the Oracle Linux deployment on OCI. As I have already a firewall configured through the Default Security List on the VCN Subnets. I will disable the internal `firewalld` service.§
[opc@ih-webserver-01 nginx]$ sudo systemctl stop firewalld
[opc@ih-webserver-01 nginx]$ sudo systemctl disable firewalld
Removed /etc/systemd/system/multi-user.target.wants/firewalld.service.
Removed /etc/systemd/system/dbus-org.fedoraproject.FirewallD1.service.
[opc@ih-webserver-01 nginx]$ sudo setenforce 0
[opc@ih-webserver-01 nginx]$
To verify if the webserver service is running I want to check if the listener is running.
Notice that 3 NGINX services are running all listening on IPv4 and port 80.
What stands out here is that I am missing the IPv6 listener.
[opc@ih-webserver-01 ~]$ sudo lsof -i -P -n
Another quick check I do is a curl to the local webserver to see if I can see the default NGINX webserver is reachable using IPv4.
[opc@ih-webserver-01 ~]$ curl http://localhost
<!DOCTYPE html>
<html>
<head>
<title>Welcome to nginx!</title>
<style>
html { color-scheme: light dark; }
body { width: 35em; margin: 0 auto;
font-family: Tahoma, Verdana, Arial, sans-serif; }
</style>
</head>
<body>
<h1>Welcome to nginx!</h1>
<p>If you see this page, the nginx web server is successfully installed and
working. Further configuration is required.</p>

<p>For online documentation and support please refer to
<a href="http://nginx.org/">nginx.org</a>.<br/>
Commercial support is available at
<a href="http://nginx.com/">nginx.com</a>.</p>

<p><em>Thank you for using nginx.</em></p>
</body>
</html>
[opc@ih-webserver-01 ~]$
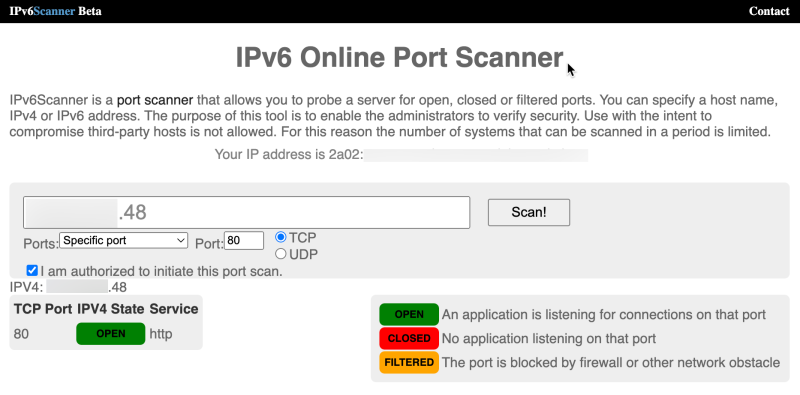
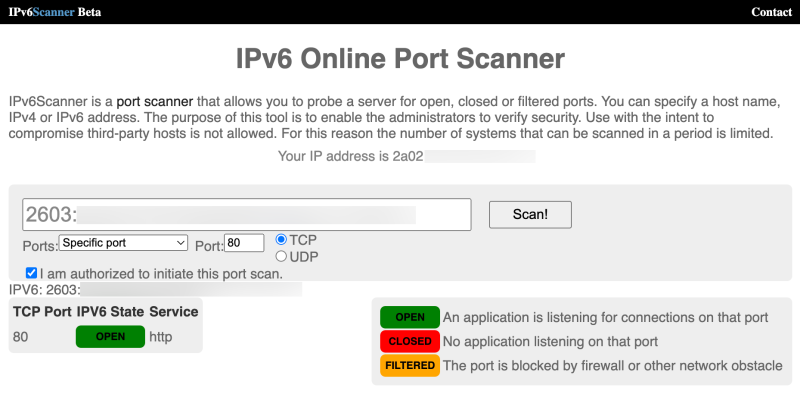
I will now do the same test from the internet using the same IPv6 Online Port Scanner website I used earlier. And now the port is OPEN for IPv4.
The final test would be to test if the website/webserver is reachable using a remote browser using IPv4.
The URL that is used:
http://144.xxx.xxx.xxx
Even though I have installed the NGINX webserver application I still get the following result for my IPv6 address.
To fix this I need to make sure that the web server is configured to listen to IPv6 addresses as well.
To do this I will edit the `default.conf` NGINX file.
[opc@ih-webserver-01 conf.d]$ sudo nano /etc/nginx/conf.d/default.conf
The “server” section of the config file looks like this:
server {
    listen       80;
    server_name  localhost;

    #access_log  /var/log/nginx/host.access.log  main;

    location / {
        root   /usr/share/nginx/html;
        index  index.html index.htm;
    }
Add this line to the server section:
**listen [::]:80;**
The full server section now looks like this:
server {
    listen       80;
    **listen  [::]:80;**
    server_name  localhost;

    #access_log  /var/log/nginx/host.access.log  main;

    location / {
        root   /usr/share/nginx/html;
        index  index.html index.htm;
    }
The full `default.conf`file looks like this:
[opc@ih-webserver-01 conf.d]$ sudo more /etc/nginx/conf.d/default.conf
server {
    listen       80;
    **listen  [::]:80;**
    server_name  localhost;

    #access_log  /var/log/nginx/host.access.log  main;

    location / {
        root   /usr/share/nginx/html;
        index  index.html index.htm;
    }

    #error_page  404              /404.html;

    # redirect server error pages to the static page /50x.html
    #
    error_page   500 502 503 504  /50x.html;
    location = /50x.html {
        root   /usr/share/nginx/html;
    }

    # proxy the PHP scripts to Apache listening on 127.0.0.1:80
    #
    #location ~ \.php$ {
    #    proxy_pass   http://127.0.0.1;
    #}

    # pass the PHP scripts to FastCGI server listening on 127.0.0.1:9000
    #
    #location ~ \.php$ {
    #    root           html;
    #    fastcgi_pass   127.0.0.1:9000;
    #    fastcgi_index  index.php;
    #    fastcgi_param  SCRIPT_FILENAME  /scripts$fastcgi_script_name;
    #    include        fastcgi_params;
    #}

    # deny access to .htaccess files, if Apache's document root
    # concurs with nginx's one
    #
    #location ~ /\.ht {
    #    deny  all;
    #}
}

[opc@ih-webserver-01 conf.d]$
Restart the NGINX webserver.
[opc@ih-webserver-01 ~]$ sudo systemctl restart nginx
Issue this command to verify the listeners again.
Notice that NGINX is also listening on IPv6 next to IPv4 now.
[opc@ih-webserver-01 conf.d]$ sudo lsof -i -P -n
I will now do the same test from the internet using the same IPv6 Online Port Scanner website I used earlier. And now the port is OPEN for IPv6.
Another quick check I do is a curl to the local webserver to see if I can see the default NGINX webserver is reachable using IPv6.
[opc@ih-webserver-01 conf.d]$ curl -6 "http://[::1]:80"
<!DOCTYPE html>
<html>
<head>
<title>Welcome to nginx!</title>
<style>
html { color-scheme: light dark; }
body { width: 35em; margin: 0 auto;
font-family: Tahoma, Verdana, Arial, sans-serif; }
</style>
</head>
<body>
<h1>Welcome to nginx!</h1>
<p>If you see this page, the nginx web server is successfully installed and
working. Further configuration is required.</p>

<p>For online documentation and support please refer to
<a href="http://nginx.org/">nginx.org</a>.<br/>
Commercial support is available at
<a href="http://nginx.com/">nginx.com</a>.</p>

<p><em>Thank you for using nginx.</em></p>
</body>
</html>
[opc@ih-webserver-01 conf.d]$
The final test is to test if the website/webserver is reachable using a remote browser using IPv6.
The URL that is used:
http://[2603:xxxx:xxxx:xxxx:xxxx:xxxx:xxxx:xxxx]
Notice that when I use an IPv6 address in the browser and need to place it between square brackets.
STEP 07» Configure DNS records
Now that the website/webserver is reachable from the internet I am going one step further by configuring an FQDN that can be remembered easier than an IPv4 address or an IPv6 address.
My goal is to use the following subdomain [oci.iwanhoogendoorn.nl] for my new web server.
- NOTE: by the time you read this I have removed the DNS records and deleted the Webserver instance in OCI, so you will not be able to reach the website.**
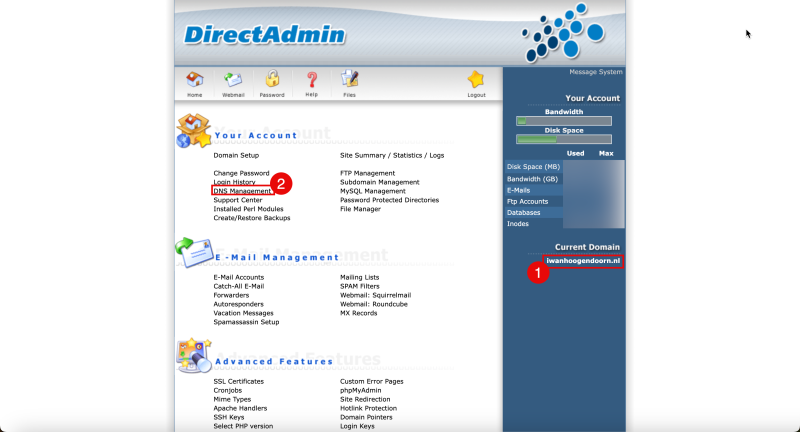
I will log in to my registrar’s Domain administration panel for my domain (iwanhoogendoorn.nl).
- Notice that I have selected the correct domain to configure
- Select “DNS Management”
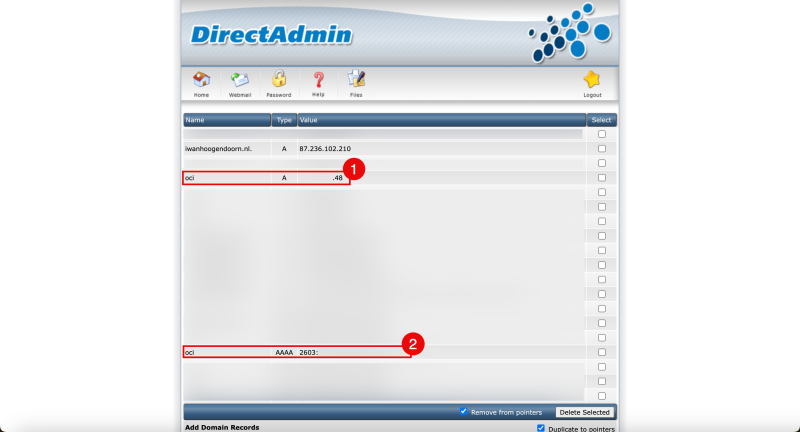
All the DNS records for my domain [iwanhoogendoorn.nl] are listed here.
- Now let’s add the “oci” subdomain to my domain for IPv4 and specify the public IPv4 address of the Instance.
- Click on “Add”.
- Now let’s add the “oci” subdomain to my domain for IPv6 and specify the IPv6 address of the Instance.
- Click on “Add”.
- In the DNS overview review the [oci.iwanhoogendoorn.nl] DNS record for IPv4.
- In the DNS overview review the [oci.iwanhoogendoorn.nl] DNS record for IPv6.
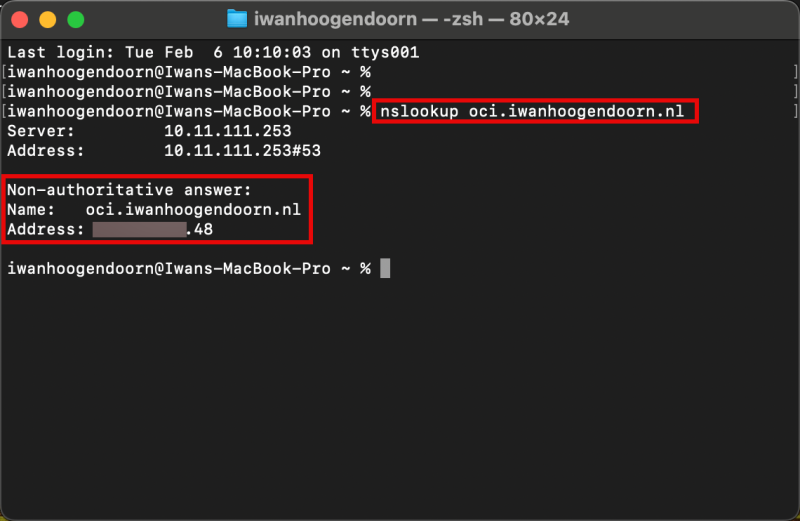
Use nslookup to test if the [oci.iwanhoogendoorn.nl] is resolved to the correct IPv4 address.
The commands that I used can be found below.
iwanhoogendoorn@Iwans-MacBook-Pro ~ % nslookup oci.iwanhoogendoorn.nl
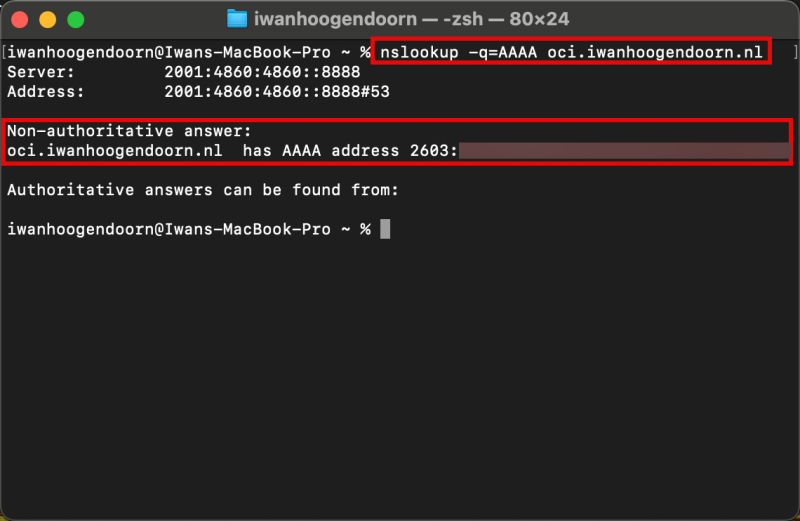
Use nslookup to test if the [oci.iwanhoogendoorn.nl] is resolved to the correct IPv6 address.
The commands that I used can be found below.
iwanhoogendoorn@Iwans-MacBook-Pro ~ % nslookup -q=AAAA oci.iwanhoogendoorn.nl
STEP 08» Create a custom website with NGINX and PHP
I decided to create a custom PHP website/script that provides a bit more information about the network and IP addresses.
Making NGINX work together with PHP is not as easy as it sounds but I will do my best to explain how I got it to work.
First, install PHP-FPM. PHP FastCGI Process Manager (PHP-FPM) is an alternative FastCGI daemon for PHP that allows a website to handle high loads.
sudo dnf install php-fpm
Do a quick check on what version of PHP is installed.
[opc@ih-webserver-01 /]$ php -v
PHP 7.2.24 (cli) (built: Oct 22 2019 08:28:36) ( NTS )
Copyright (c) 1997-2018 The PHP Group
Zend Engine v3.2.0, Copyright (c) 1998-2018 Zend Technologies
[opc@ih-webserver-01 /]$
To get NGINX to play nicely with PHP and the other way around some configuration needs to be done on different configuration files on the PHP side and the NGNIX side.
Depending on your Linux distribution and the NGINX and PHP-FPM versions you use the configuration file names and path names may be different and this makes the integration part of NGINX and PHP much harder.
Important files and directories for PHP-FPM and NGINX:
| Description | Oracle Linux 8 | Other installations/distributions | | --- | --- | --- | | NGINX web root path | /usr/share/nginx/html | /usr/share/nginx/www | | PHP FPM configuration file | /etc/php-fpm.d/www.conf | php-fpm.conf | | NGINX configuration file | /etc/nginx/conf.d/default.conf | nginx.conf | | PHP FPM socket file | /run/php-fpm/www.sock | php-fpm.sock, phpx.x-fpm.sock (x.x = version) | | FastCGI settings file | /etc/nginx/fastcgi_params | fastcgi.conf | | PHP configuration file | /etc/php.ini | |
The sub–steps to integrate NGINX and PHP and create a custom web page
To properly integrate NGINX with PHP the following steps need to be followed:
- SUB-STEP 08a: Edit the PHP FPM configuration file to integrate NGINX
- SUB-STEP 08b: Edit the NGINX configuration file to integrate PHP FPM
- SUB-STEP 08c: Edit the php.ini configuration file
- SUB-STEP 08d: Restart the PHP FPM and NGINX services
- SUB-STEP 08e: Create custom pages for proper webpage handling and testing
SUB–STEP 08a» Edit the PHP FPM configuration file to integrate NGINX
Edit the `/etc/php-fpm.d/www.conf` file:
sudo nano /etc/php-fpm.d/www.conf
Change this:
; Unix user/group of processes
; Note: The user is mandatory. If the group is not set, the default user's group
;  will be used.
; RPM: apache user chosen to provide access to the same directories as httpd
**user =** apache
; RPM: Keep a group allowed to write in log dir.
**group =** apache
To this:
; Unix user/group of processes
; Note: The user is mandatory. If the group is not set, the default user's group
;  will be used.
; RPM: apache user chosen to provide access to the same directories as httpd
**user = nginx**
; RPM: Keep a group allowed to write in log dir.
**group = nginx**
SUB–STEP 08b» Edit the NGINX configuration file to integrate PHP FPM
Edit the `/etc/nginx/conf.d/default.conf` file:
[opc@ih-webserver-01 html]$ sudo nano /etc/nginx/conf.d/default.conf
Add/change the following configuration:
location / {
    **# where is the NGINX root www folder?**
        root   /usr/share/nginx/html;
    # what are the default index files to look for in the directory?
        index **index.php** index.html index.htm;
    }

    # tell NGINX what to do when it sees PHP-FPM giving a 404 HTTP status in the response
    **location = /404.php {
    # where is the NGINX root www folder?
      root   /usr/share/nginx/html;
    # not return error responses with relevant status codes
      fastcgi_intercept_errors off;
    # where is PHP-FPM listening? the socket
      fastcgi_pass unix:/var/run/php-fpm/www.sock;
    # everytime we're in this location, tell PHP-FPM the complete script filename to be executed
      fastcgi_param SCRIPT_FILENAME $document_root$fastcgi_script_name;
    # and don't forget to tell PHP-FPM stuff like SERVER_NAME:
      include fastcgi_params;
    }**

    # tell NGINX what to do when it sees PHP-FPM a .php file
    **location ~ \.php$ {
    # where is the NGINX root www folder?
      root   /usr/share/nginx/html;
    # define custom error pages
      error_page 404 /404.php;
    # return error responses with relevant status codes
      fastcgi_intercept_errors on;
    # where is PHP-FPM listening? the socket
      fastcgi_pass unix:/var/run/php-fpm/www.sock;
    # everytime we're in this location, tell PHP-FPM the complete script filename to be executed
      fastcgi_param SCRIPT_FILENAME $document_root$fastcgi_script_name;
    # and don't forget to tell PHP-FPM stuff like SERVER_NAME:
      include fastcgi_params;
     }**
SUB–STEP 08c» Edit the php ini configuration file
Edit the `/etc/php.ini` file:
[opc@ih-webserver-01 /]$ sudo nano /etc/php.ini
Make sure the following line is present/changed/uncommented:
cgi.fix_pathinfo=0
SUB–STEP 08d» Restart the PHP FPM and NGINX services
Restart the PHP FPM service:
sudo systemctl start php-fpm
Restart the NGINX service:
sudo systemctl restart nginx
SUB–STEP 08e» Create custom pages for proper webpage handling and testing
Create a custom `404.php` page.
This is required to properly handle the redirection to a custom 404 page if the page does not exist that is trying to be accessed.
[opc@ih-webserver-01 html]$ sudo nano 404.php
The code for the custom 404 page:
<?php
  header("HTTP/1.0 404 Not Found");
?>
<html>
  <head>
    <title>404 Error - Page Not Found</title>
  </head>
  <body>404 Error - Page Not Found!</body>
</html>
Create a custom `info.php` page.
[opc@ih-webserver-01 html]$ sudo nano info.php
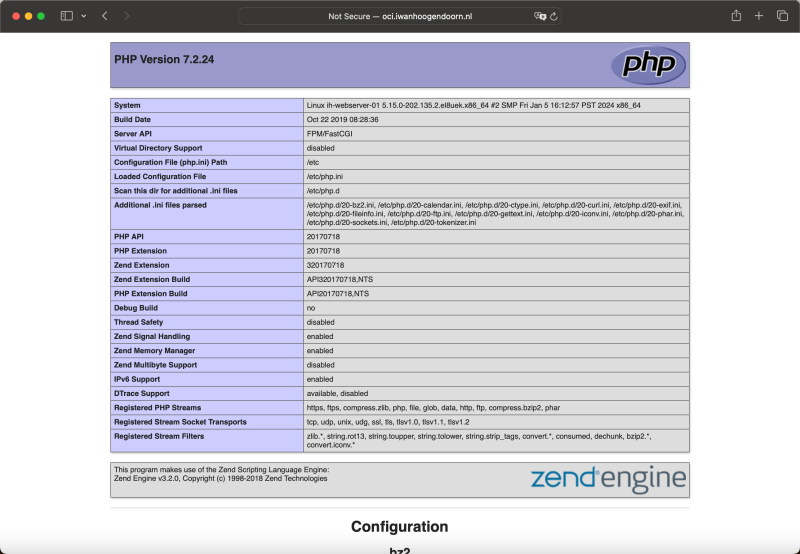
The code for the PHP info page:
<?php

phpinfo();
Testing out the info.php website provides proof that PHP is working with NGNIX.
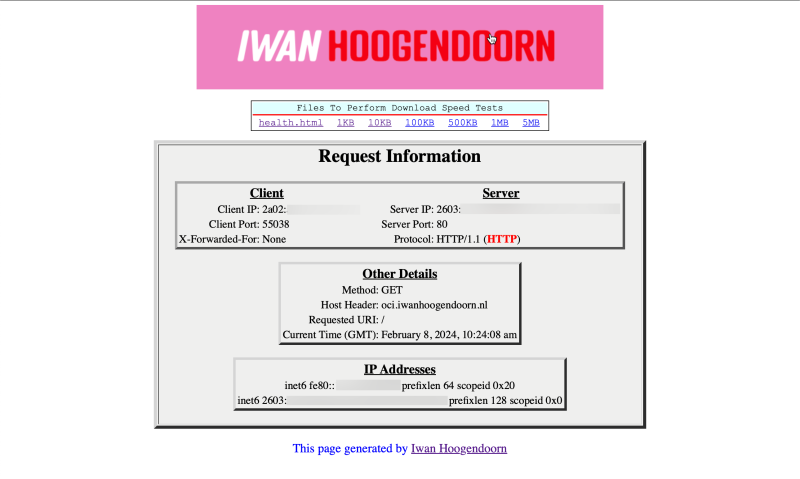
Create a new custom home page with network information:
The code/files to use the PHP test IP script can be found on my personal Github page
When the website is installed and configured correctly the following webpage is displayed.
This page will provide information about your local and remote IPv4 or IPv6 addresses depending on what IP version you use to connect. This page will also tell you if you are using HTTP or HTTPS.
STEP 09» Test the web server from the internet
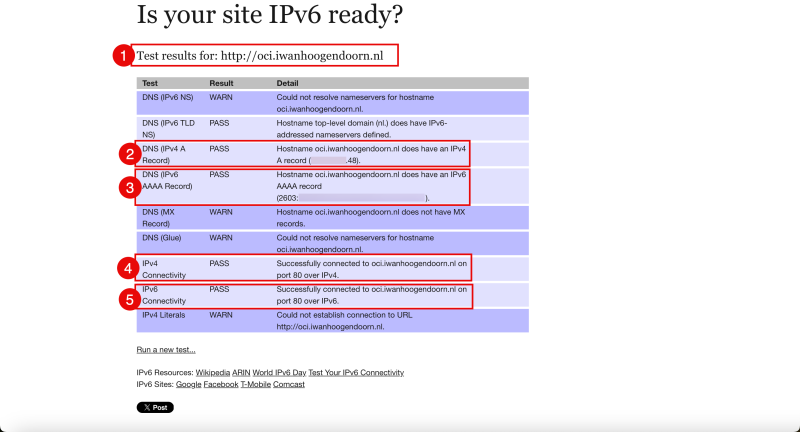
Even though I have already tested the reachability of the website/webserver using multiple methods I like to use the following website to perform my final test that will test the reachability and the DNS record configuration in one go.
Online IPv6 website readyness tester
- Use the FQDN [oci.iwanhoogendoorn.nl] to test with.
- Verify if the IPv4 DNS records are configured correctly.
- Verify if the IPv6 DNS records are configured correctly.
- Verify the if website is reachable on IPv4.
- Verify the if website is reachable on IPv6.
Conclusion
In this article, I have explained how to create a website using an OCI Instance that is reachable through IPv6 I have also explained how to create and configure all the other prerequisites to make the website available eventually. As a bonus, I have also explained how the NGINX web server is installed and how PHP is integrated. Finally, I also provided a custom PHP website/script that can be used to verify your IPv4 or IPv6 connectivity to your web server and if you are connecting with HTTP or HTTPS.
