Using the OCI VCN-Native Networking CNI plugin to provide networking services to containers inside Oracle Container Engine for Kubernetes - OKE
By default, the Oracle Kubernetes Engine (OKE) uses the OCI VCN-Native CNI plugin to provide network (security) features to containerized applications. In this tutorial, I will show you how you can verify what CNI plugin is used and how we can use this default CNI plugin (VCN-Native CNI) to configure a Load Balancer Service and attach that to an application that is running inside a container.
The Steps
- STEP 01: Deploy a Kubernetes Cluster (using OKE)
- STEP 02: Verify the installed CNI Plugin
- STEP 03: Deploy a sample application
- STEP 04: Configure Kubernetes Services of Type LoadBalancer
- STEP 05: Removing the sample application and Kubernetes Services of Type LoadBalancer
STEP 01 - Deploy a Kubernetes Cluster using OKE
In [this] article you can read about the different OKE deployment models you can choose from.
The flavors are as follows:
- Example 1: Cluster with Flannel CNI Plugin, Public Kubernetes API Endpoint, Private Worker Nodes, and Public Load Balancers
- Example 2: Cluster with Flannel CNI Plugin, Private Kubernetes API Endpoint, Private Worker Nodes, and Public Load Balancers
- Example 3: Cluster with OCI CNI Plugin, Public Kubernetes API Endpoint, Private Worker Nodes, and Public Load Balancers
- Example 4: Cluster with OCI CNI Plugin, Private Kubernetes API Endpoint, Private Worker Nodes, and Public Load Balancers
I have chosen to go for the Example 3 deployment model and you can read how this was deployed in this article. (ADD ARTICLE LATER)
STEP 02 - Verify the installed CNI Plugin
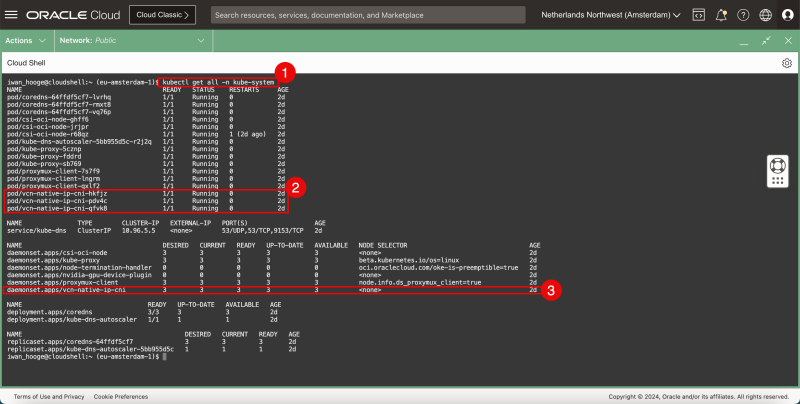
When the Oracle Kubernetes Engine (OKE) is fully deployed and you have access to this you can issue the following command
- 1. Issue the following command:
iwan_hooge@cloudshell:~ (eu-amsterdam-1)$ kubectl get all -n kube-system
    NAME                                      READY   STATUS    RESTARTS     AGE
    pod/coredns-64ffdf5cf7-lvrhq              1/1     Running   0            2d
    pod/coredns-64ffdf5cf7-rmxt8              1/1     Running   0            2d
    pod/coredns-64ffdf5cf7-vq76p              1/1     Running   0            2d
    pod/csi-oci-node-ghff6                    1/1     Running   0            2d
    pod/csi-oci-node-jrjpr                    1/1     Running   0            2d
    pod/csi-oci-node-r68qz                    1/1     Running   1 (2d ago)   2d
    pod/kube-dns-autoscaler-5bb955d5c-r2j2q   1/1     Running   0            2d
    pod/kube-proxy-5cznp                      1/1     Running   0            2d
    pod/kube-proxy-fddrd                      1/1     Running   0            2d
    pod/kube-proxy-sb769                      1/1     Running   0            2d
    pod/proxymux-client-7s7f9                 1/1     Running   0            2d
    pod/proxymux-client-lngrm                 1/1     Running   0            2d
    pod/proxymux-client-qxlf2                 1/1     Running   0            2d
    pod/vcn-native-ip-cni-hkfjz               1/1     Running   0            2d
    pod/vcn-native-ip-cni-pdv4c               1/1     Running   0            2d
    pod/vcn-native-ip-cni-qfvk8               1/1     Running   0            2d

    NAME               TYPE        CLUSTER-IP   EXTERNAL-IP   PORT(S)                  AGE
    service/kube-dns   ClusterIP   10.96.5.5    <none>        53/UDP,53/TCP,9153/TCP   2d

    NAME                                      DESIRED   CURRENT   READY   UP-TO-DATE   AVAILABLE   NODE SELECTOR                                 AGE
    daemonset.apps/csi-oci-node               3         3         3       3            3           <none>                                        2d
    daemonset.apps/kube-proxy                 3         3         3       3            3           beta.kubernetes.io/os=linux                   2d
    daemonset.apps/node-termination-handler   0         0         0       0            0           oci.oraclecloud.com/oke-is-preemptible=true   2d
    daemonset.apps/nvidia-gpu-device-plugin   0         0         0       0            0           <none>                                        2d
    daemonset.apps/proxymux-client            3         3         3       3            3           node.info.ds_proxymux_client=true             2d
    daemonset.apps/vcn-native-ip-cni          3         3         3       3            3           <none>                                        2d

    NAME                                  READY   UP-TO-DATE   AVAILABLE   AGE
    deployment.apps/coredns               3/3     3            3           2d
    deployment.apps/kube-dns-autoscaler   1/1     1            1           2d

    NAME                                            DESIRED   CURRENT   READY   AGE
    replicaset.apps/coredns-64ffdf5cf7              3         3         3       2d
    replicaset.apps/kube-dns-autoscaler-5bb955d5c   1         1         1       2d
    iwan_hooge@cloudshell:~ (eu-amsterdam-1)$
- 2. Notice the name “vcn-native” in the output in the pod section.
- 3. Notice the name “vcn-native” in the output in the deamonset section.
This will tell you that the OCI VCN-Native CNI plugin is currently used for this deployed OKE deployment.
STEP 03 - Deploy a sample application
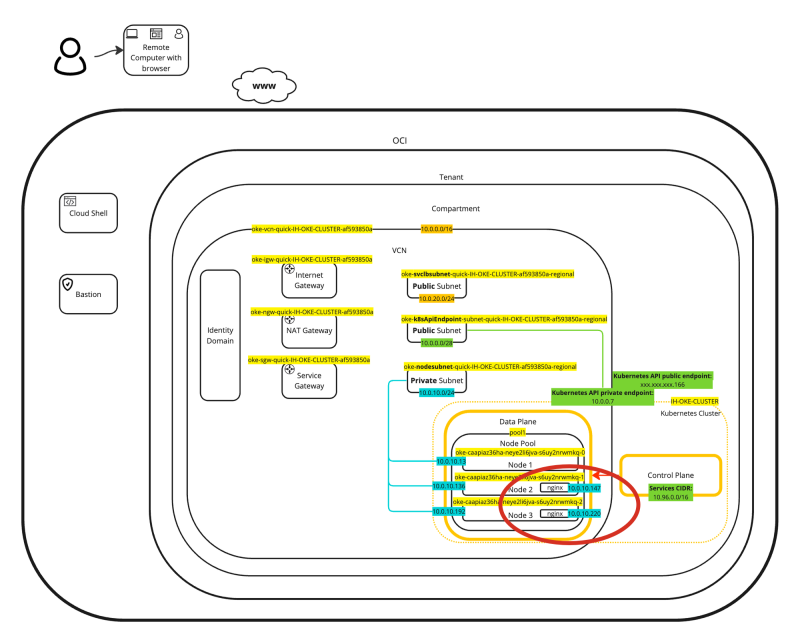
Now I am going to deploy a sample application. We will use this sample application together with the OCI VCN-Native CNI plugin and enable the Load Balancer Service type in the next step.
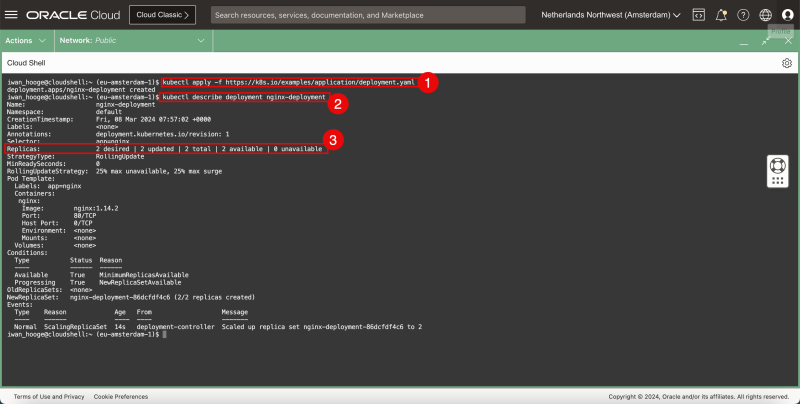
- 1. Issue the following command to deploy a sample (NGINX) application inside OKE:
iwan_hooge@cloudshell:~ (eu-amsterdam-1)$ kubectl apply -f https://k8s.io/examples/application/deployment.yaml
    deployment.apps/nginx-deployment created
- 2. Issue the following command to verify the details of the deployed sample (NGINX) application:
iwan_hooge@cloudshell:~ (eu-amsterdam-1)$ kubectl describe deployment nginx-deployment
    Name:                   nginx-deployment
    Namespace:              default
    CreationTimestamp:      Fri, 08 Mar 2024 07:57:02 +0000
    Labels:                 <none>
    Annotations:            deployment.kubernetes.io/revision: 1
    Selector:               app=nginx
    Replicas:               2 desired
- 3. Notice that the application is deployed using two pods.
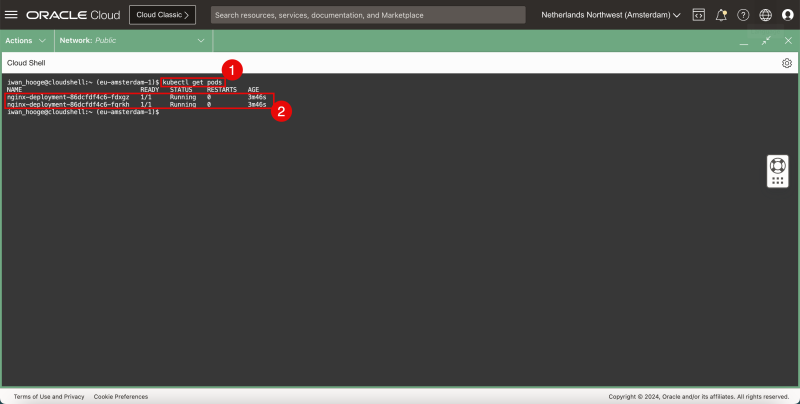
- 1. Issue this command to take a closer look at the deployed pods:
iwan_hooge@cloudshell:~ (eu-amsterdam-1)$ kubectl get pods
    NAME                                READY   STATUS    RESTARTS   AGE
    nginx-deployment-86dcfdf4c6-fdxgz   1/1     Running   0          3m46s
    nginx-deployment-86dcfdf4c6-fqrkh   1/1     Running   0          3m46s
    iwan_hooge@cloudshell:~ (eu-amsterdam-1)$
- 2. Notice that there are two instances/pods/replicas of the NGINX application and the status is set to RUNNING.
A visual representation of the deployment can be found in the diagram below. Focus on the two deployed pods inside the worker nodes.
STEP 04 - Configure Kubernetes Services of Type LoadBalancer
Now that we have our sample application running inside the OKE it is time to expose the application to the network (the internet) by attaching a network service of the type LoadBalancer to the application.
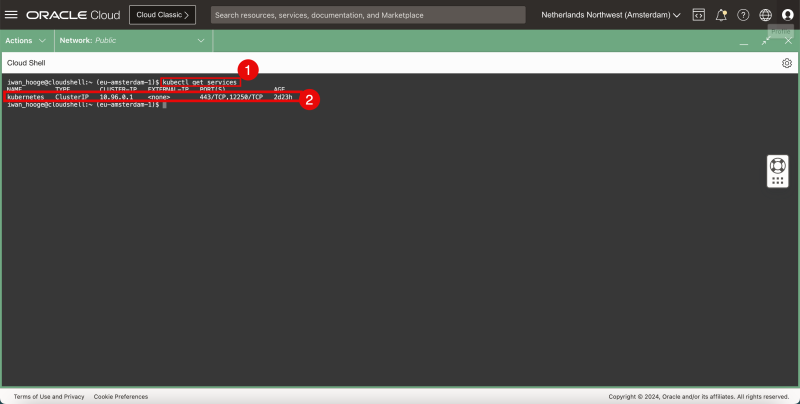
- 1. Issue the following command to review the existing running services in the Kubernetes Cluster:
iwan_hooge@cloudshell:~ (eu-amsterdam-1)$ kubectl get services
    NAME         TYPE        CLUSTER-IP   EXTERNAL-IP   PORT(S)             AGE
    kubernetes   ClusterIP   10.96.0.1    <none>        443/TCP,12250/TCP   2d23h
    iwan_hooge@cloudshell:~ (eu-amsterdam-1)$
- 2. Notice that the only service that is running belongs to the Kubernetes Control Plane itself.
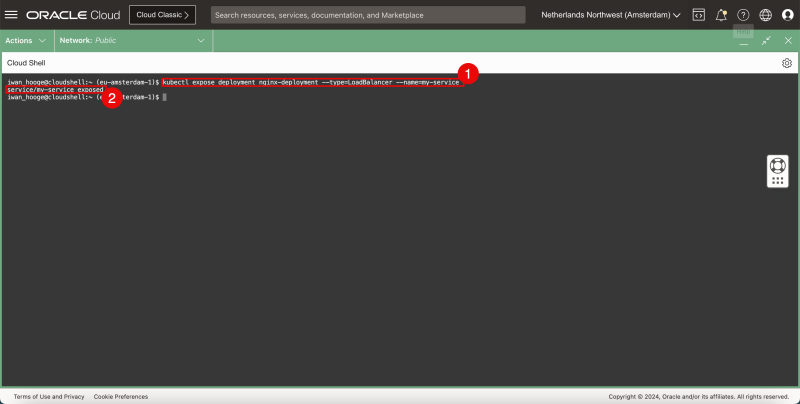
- 1. Issue the following command to deploy a new (VCN-Native CNI plugin) network service of the type LoadBalancer and expose this new service to the application we just deployed:
iwan_hooge@cloudshell:~ (eu-amsterdam-1)$ kubectl expose deployment nginx-deployment --type=LoadBalancer --name=my-service
    service/my-service exposed
    iwan_hooge@cloudshell:~ (eu-amsterdam-1)$
- 2. Notice the message that the service is successfully exposed.
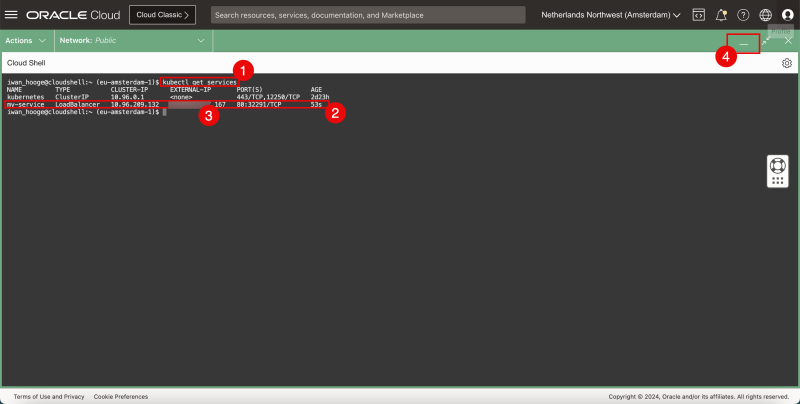
- 1. Issue the following command again to review the existing running services in the Kubernetes Cluster:
iwan_hooge@cloudshell:~ (eu-amsterdam-1)$ kubectl get services
    NAME         TYPE           CLUSTER-IP      EXTERNAL-IP       PORT(S)             AGE
    kubernetes   ClusterIP      10.96.0.1       <none>            443/TCP,12250/TCP   2d23h
    my-service   LoadBalancer   10.96.209.132   xxx.xxx.xxx.167   80:32291/TCP        53s
    iwan_hooge@cloudshell:~ (eu-amsterdam-1)$
- 2. Notice that the service we have just configured is now on the list
- 3. Notice the EXTERNAL-IP (Public IP address) that has been assigned to the Load Balancer (ending with .167)
- 4. Click on the minimize button to minimize the Cloud Shell Window.
Open a new browser.
When we copy this Public IP address and paste it into our browser address field we can now access the NGINX webserver that is deployed on a container inside the Oracle Kubernetes Engine (OKE).
We can also take a closer look at what is happening under the hood by using the OCI console.
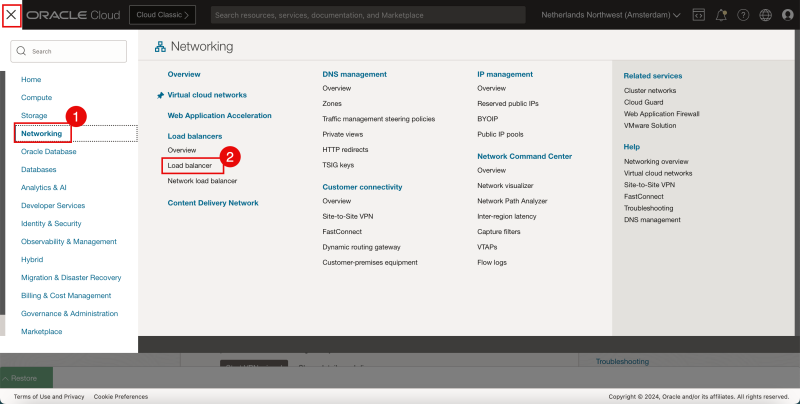
Of we browse to Networking > Loadbalancers
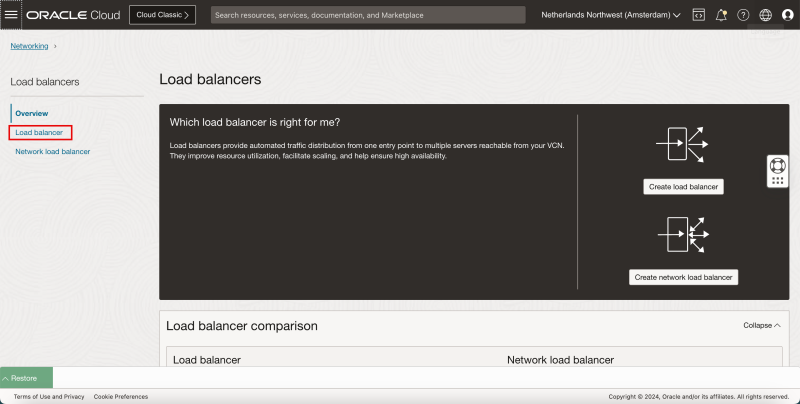
Click on Load Balancer.
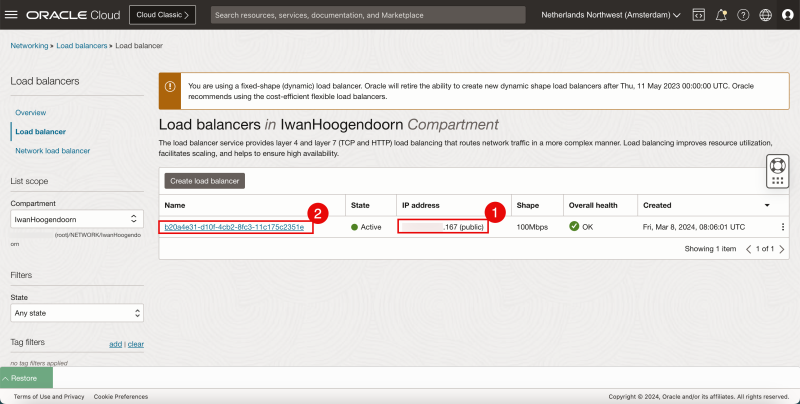
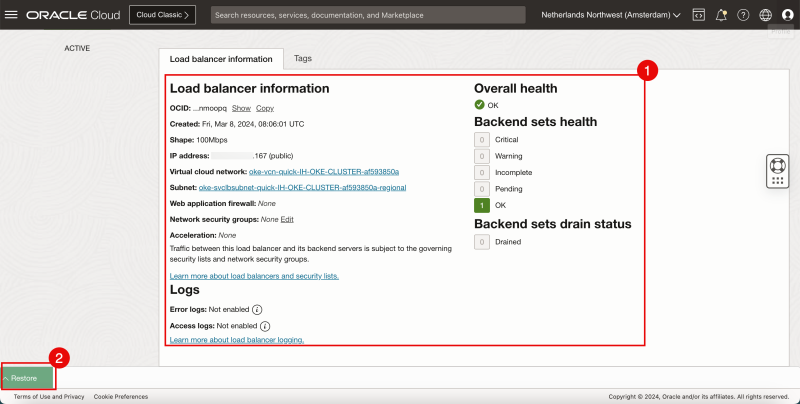
- 1. Notice there is a new load balancer deployed with the public IP address ending with .167.
- 2. Click on the name of the load balancer.
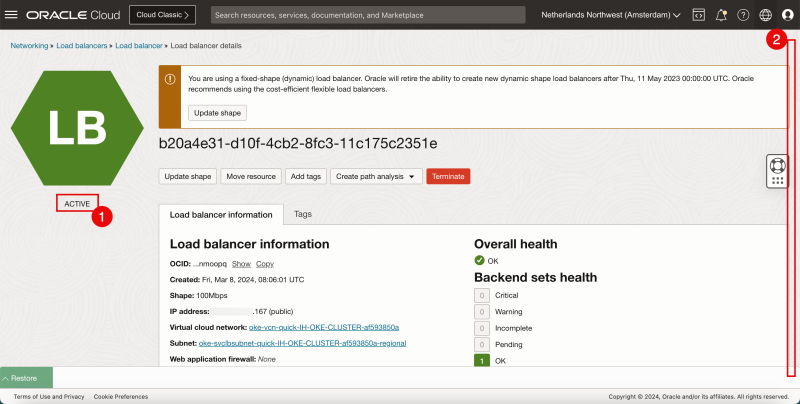
- 1. Notice that the load balancer is ACTIVE.
- 2. Scroll down.
- 1. Review the configuration details of the deployed load balancer.
- 2. Click on the Restore button to restore the Cloud Shell Window.
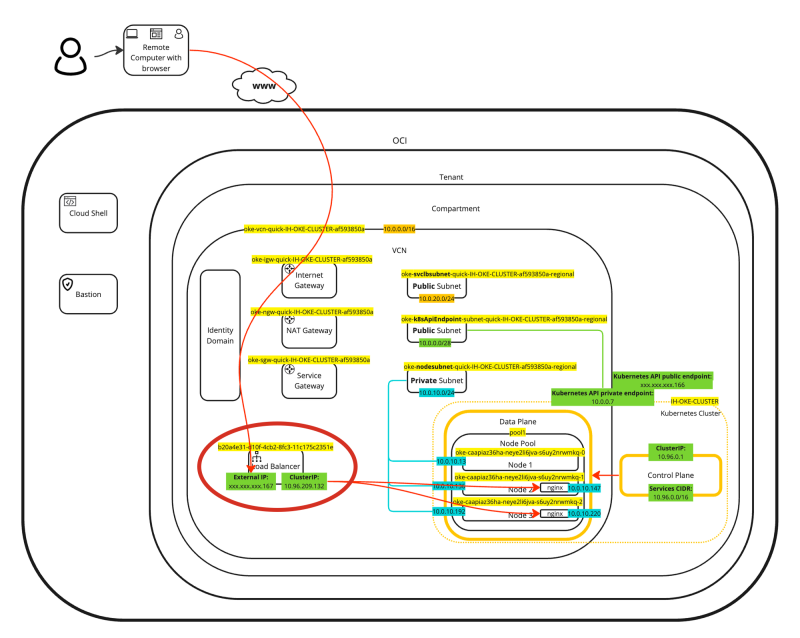
A visual representation of the load balancer deployment can be found in the diagram below. Focus on the load balancer.
STEP 05 - Removing the sample application and Kubernetes Services of Type LoadBalancer
Now that we have deployed a sample application and created a new Kubernetes network service of the type Load Balancer it is time to clean up the application and the service.
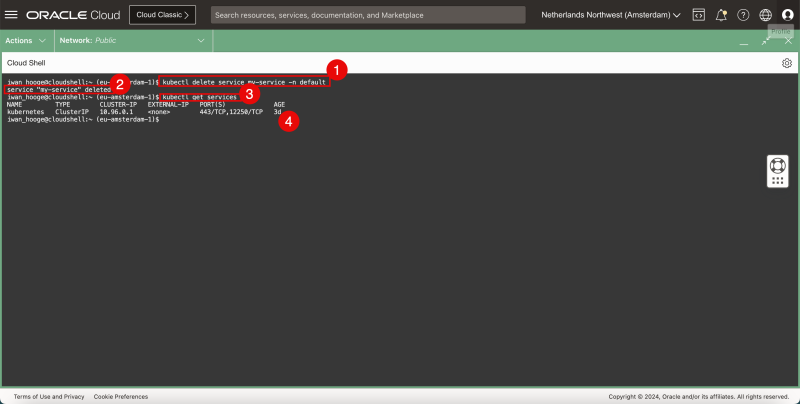
- 1. Issue this command to delete the Load Balancer service:
iwan_hooge@cloudshell:~ (eu-amsterdam-1)$ kubectl delete service my-service -n default
    service "my-service" deleted
- 2. Notice the message that the service (load balancer) is successfully deleted.
- 3. Issue the following command to verify if the service (load balancer) is deleted:
iwan_hooge@cloudshell:~ (eu-amsterdam-1)$ kubectl get services
    NAME         TYPE        CLUSTER-IP   EXTERNAL-IP   PORT(S)             AGE
    kubernetes   ClusterIP   10.96.0.1    <none>        443/TCP,12250/TCP   2d23h
    iwan_hooge@cloudshell:~ (eu-amsterdam-1)$
- 4. Notice that the service (load balancer) is deleted.
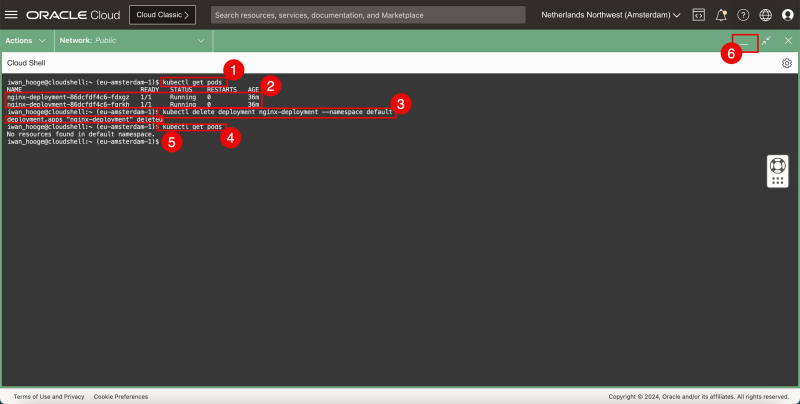
- 1. Issue the following command to retrieve the existing pods:
iwan_hooge@cloudshell:~ (eu-amsterdam-1)$ kubectl get pods
    NAME                                READY   STATUS    RESTARTS   AGE
    nginx-deployment-86dcfdf4c6-fdxgz   1/1     Running   0          36m
    nginx-deployment-86dcfdf4c6-fqrkh   1/1     Running   0          36m
- 2. Notice that the NGINX application is still running.
- 3. Issue the following command to delete the deployment of the NGINX application:
iwan_hooge@cloudshell:~ (eu-amsterdam-1)$ kubectl delete deployment nginx-deployment --namespace default
    deployment.apps "nginx-deployment" deleted
- 4. Issue the following command to retrieve the existing pods again (to verify the deployment is deleted):
iwan_hooge@cloudshell:~ (eu-amsterdam-1)$ kubectl get pods
    No resources found in default namespace.
    iwan_hooge@cloudshell:~ (eu-amsterdam-1)$
- 5. Notice that the NGINX application is deleted.
- 6. Click on the minimize button to minimize the Cloud Shell Window.
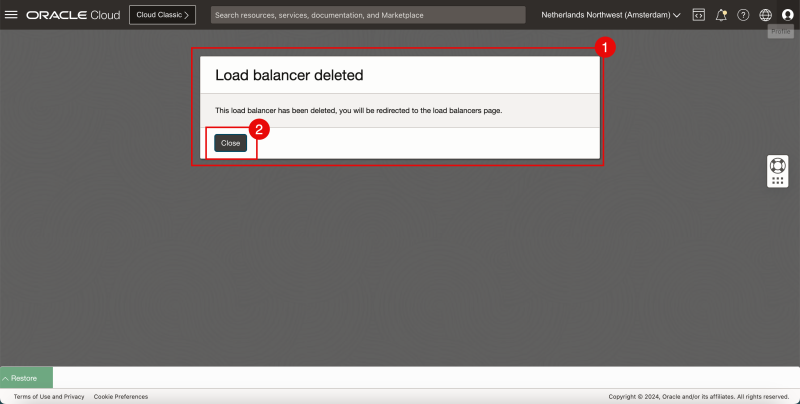
- 1. Notice that the OCI Console will display a message that the Load Balancer is deleted.
- 2. Click on the Close button
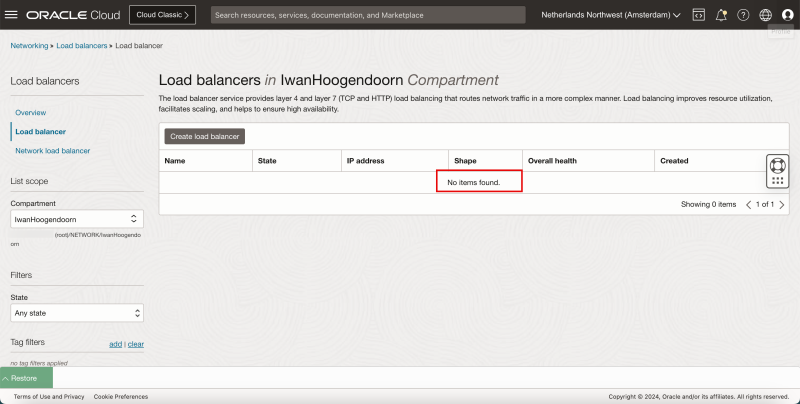
Notice that there is no load balancer deployed anymore (because we just deleted the service).
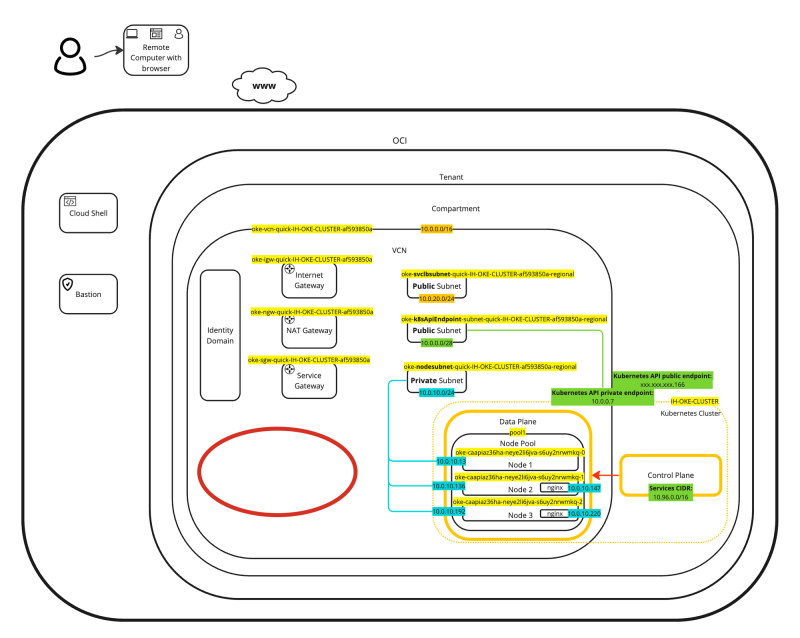
A visual representation of the load balancer deletion can be found in the diagram below. Focus on the part where the load balancer is no longer deployed.
Conclusion
In this article, we have seen how we can verify the default CNI plugin that is used by the Oracle Kubernetes Engine (OKE). We have also deployed a new NGINX containerized application to test some basic networking features of the default VCN-Native CNI plugin. We leveraged the VCN-Native CNI plugin to create a new network service of the type load balancer and exposed that service to our deployed NGINX application. In the end, we cleared up the application and the load-balancing service.
